|
IDA-72
SCR Conversion to MCCR
project Conversion done by Johan Pretorius |
|
|
1st things 1st and thanks, honours and credits
to those that deserve it. |
|
|
I got most of my inspiration and all my theoretical knowledge on the
IDA-72 from Dave’s “nobubble” site, the work he did for other IDA-72
divers and for that I must thank him.
A lot of the modification ideas were bounced of my good friend and
dive buddy
My father who assisted me in the modification process, although not
a diver himself, his simple logic, insistent questioning of my
thinking and reasoning, as well as his ability to do magic with
limited tools, helped me resolve many of the issues I got stuck
with. |
|
|
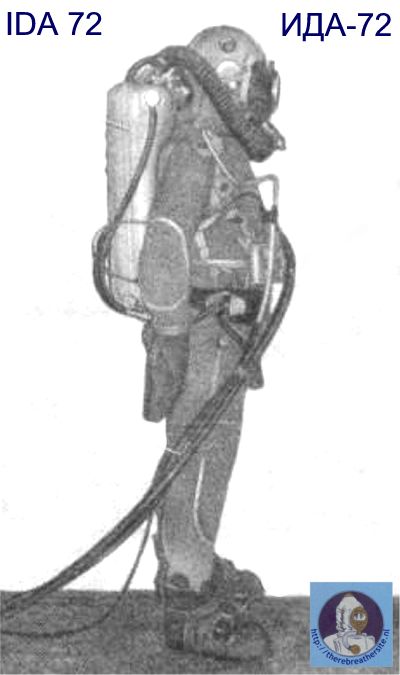
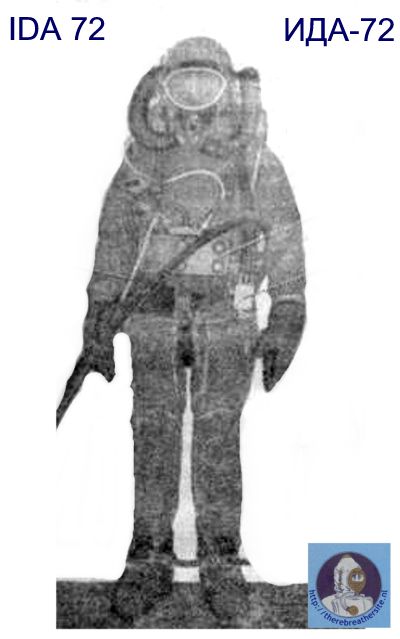
This is my documented effort to convert a Russian manufactured Deep
Water Umbilical Supplied Heliox SCR (Semi Closed System rebreather)
named the IDA-72 to a
MCCR (Manually Operated Closed Circuit Rebreather) with
Trimix capabilities. I tried to keep the system as original as
possible, so as not to lose the essential character of the machine,
although the machine’s working character had to be completely
changed for the process to be successful. (If that mumble makes
sense to anybody?) The main reason why I chose the
IDA-72 as my rebreather of choice is very
neatly summed up in the following paragraph, taken from Dave
Sutton’s website. |
|
|
“The Russian IDA-72 is a rather unique Semi-Closed Circuit
rebreather designed to be fed by an umbilical for surface-supplied
or saturation diving using Heliox. It has 2
x 2-liter internal cylinders that were originally designed to be
used as bailout cylinders in case the umbilical supply was lost, a
very large scrubber capacity, and an extremely interesting belt-worn
valve block that allows the diver to flush the loop and also to
split the loop and cause the rig to become a demand-only system.
This last feature is totally unique as far as I can determine, and
is a very interesting design feature. This feature alone makes the
IDA-72 worthy of close study.”
- Dave Sutton |
|
 |
 |
|
This meant that with some clever modification, I can have a Closed
Circuit Machine, designed to work at 200m depth, with a belt block
that allows me to effortlessly flush the loop with dilluent, and the
ability to switch to an Open Circuit demand system, with the flick
of a switch. |
|
|
I am not going to give a tear down of the machine in stock standard
format, as this info is already excellently documented by Dave
Sutton, and the info can be viewed on his website at the following
address:
http://nobubblediving.com/old_site/ida72.htm |
|
|
A quick visit there will acquaint you with the workings of the
original stock standard IDA-72 and can help understand how and why
certain systems work.
The machine will offer the following inherent and added safety
features when completed:
Here you have what I believe, is the safest Rebreather system
available (not on the market today).
Works for me……. |
|
|
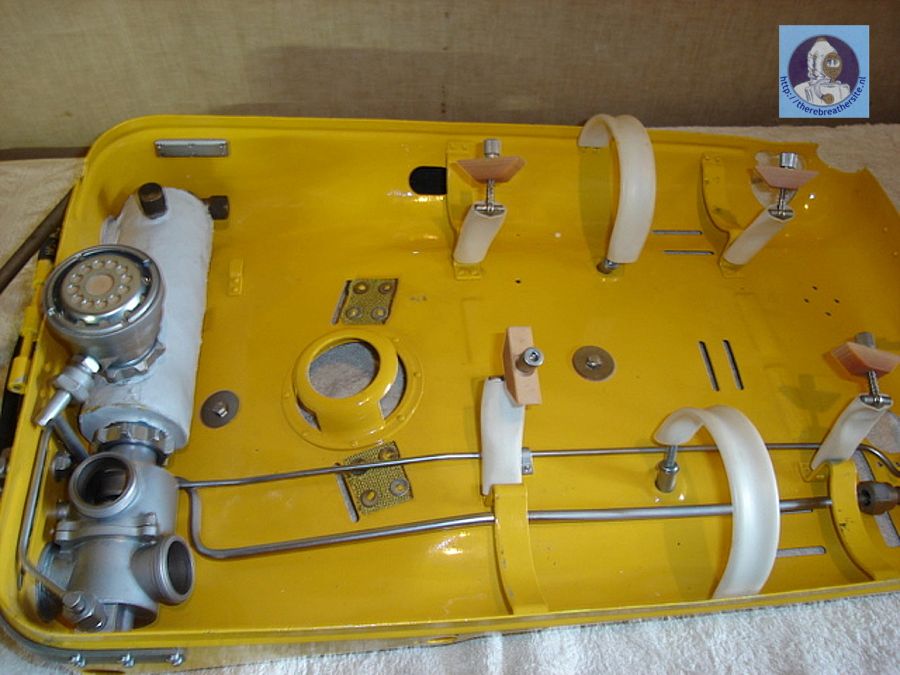
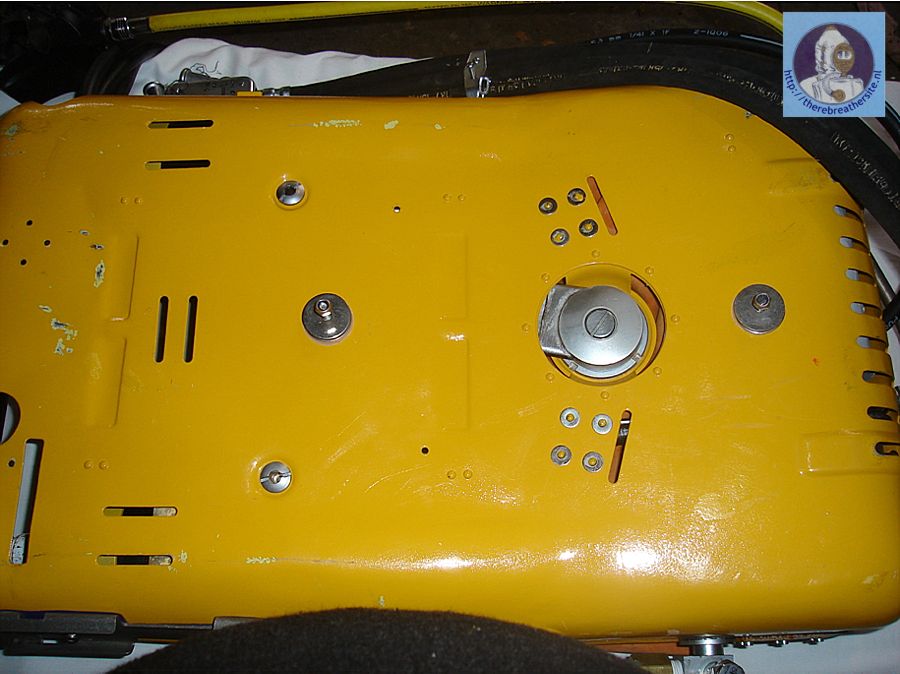
Stripping the machine
Not a very nice time for me….Having to remove the heart, or is it
guts, of the machine?…
But, all parts were safely kept, with as little as possible damage
done. I tried to keep the machine as original as possible, but some
stuff had to go….
What I ended up, is basically a bare chassis, with a breathing
plenum and what I call the dilluent injection array consisting of an
inlet connector with OPV and two pipes that will feed the breathing
plenum and allow for operation mode switching.
But, I had the basis of my MCCR rebuilding plan.
The huge chassis of the machine lends it self to various
opportunities and possibilities, and I had to really keep focus on
hat I wanted to achieve. Don’t be fooled, the scrubber that goes
into the cavernous chassis is HUGE. |
|
 |
|
|
The breathing plenum on the left, with the two pipes that will be
supplying pressurised gas for mode switching. The original cylinder
belts are still in place and will be used as is. The snakes’ nest
that is supposed to be found at the bottom has been removed, as it
will unfortunately not form part of my conversion idea.
|
|
 |
|
|
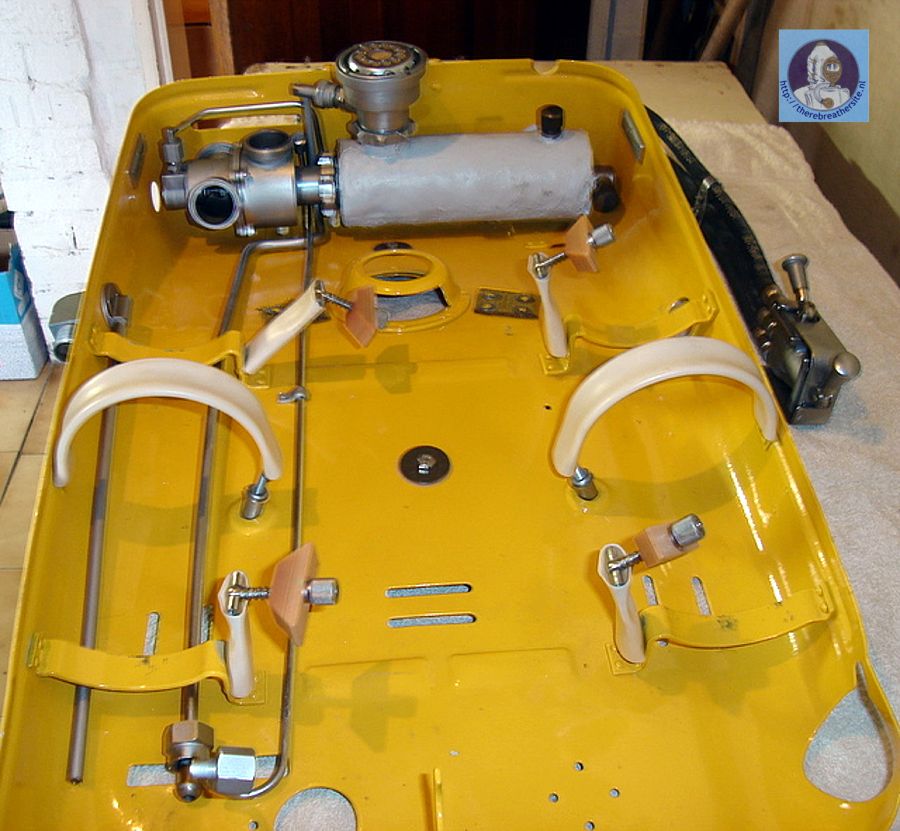
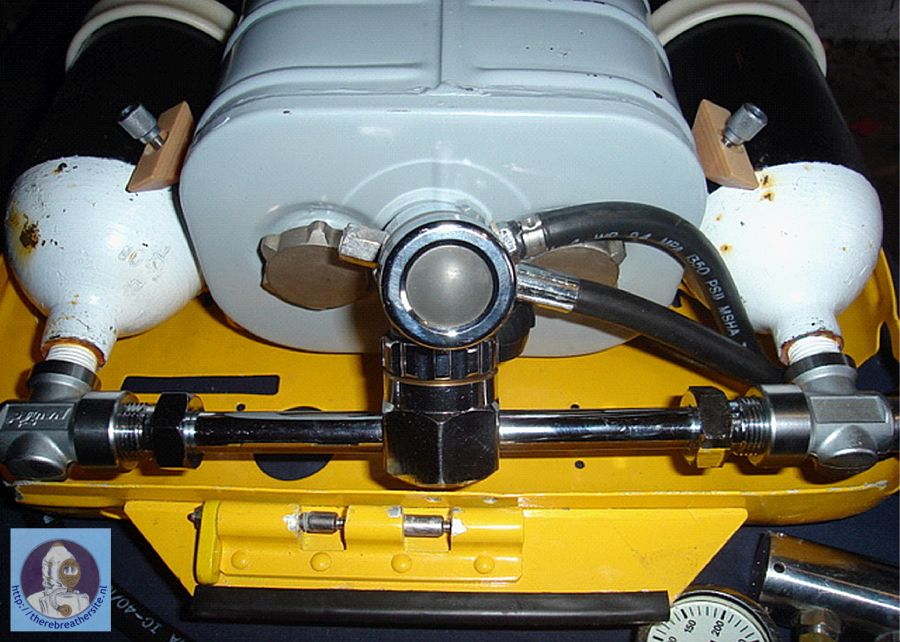
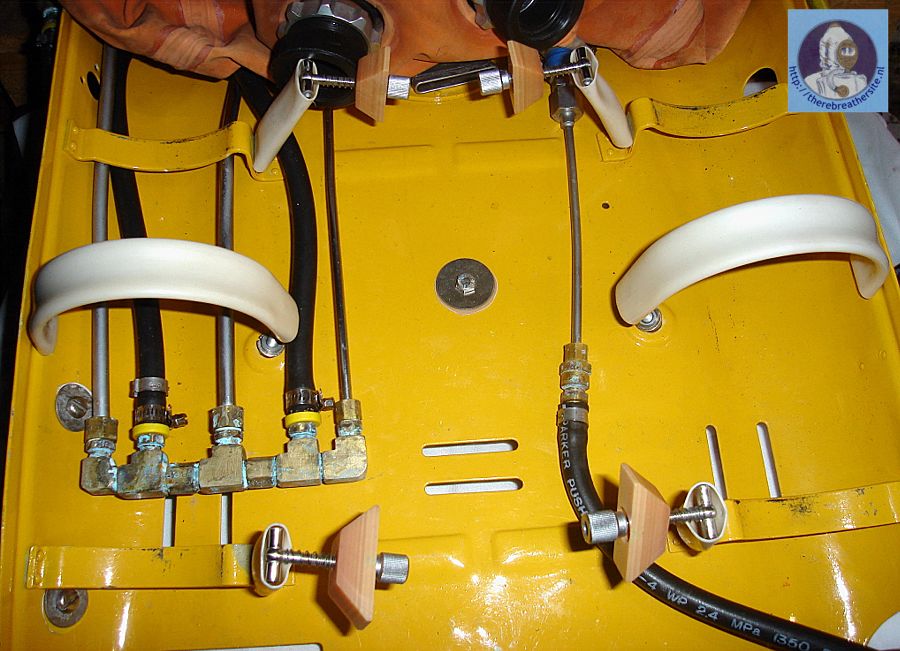
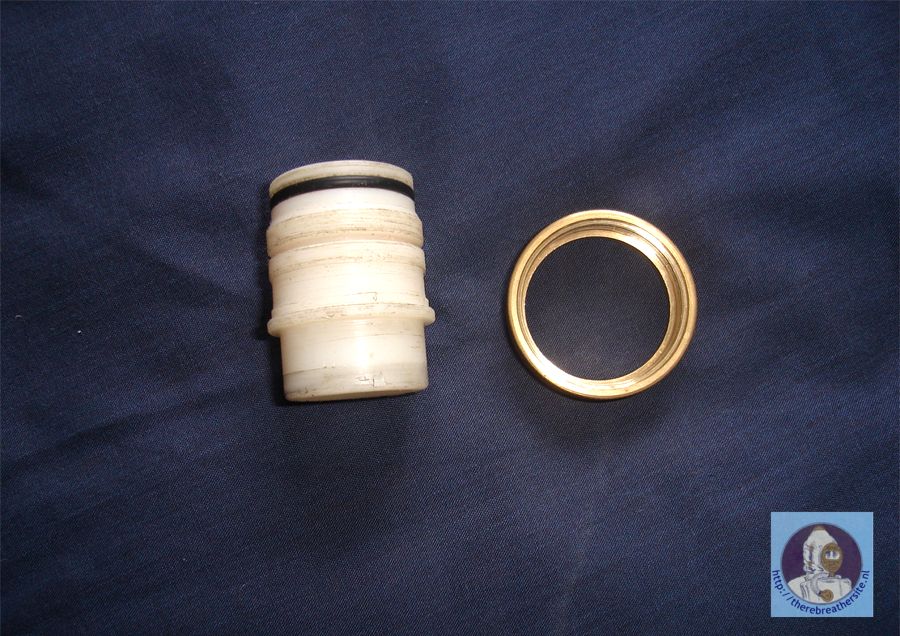
Diluent injector array and gas plumbing
The IDA-72 is very cleverly designed. It was designed to be fed by
an umbilical from a diving bell or similar type of set-up at extreme
depths. This meant that the IDA-72 had a very smart dilluent
connection system, to ensure the dilluent got to all the important
places. I decided to keep the system as unchanged as possible
(mostly). Unfortunately I had to remove the female umbilical
connector as the male part is in
I opted to put in a Quick Connect system, with the female Quick
Connect on the Dilluent supply and the male Quick Connect on the
rebreather. The Umbilical connection has an “interesting” thread
size, and I had to source an adapter to fit the connector, which
ends in a ¼ inch push lock barb. An alternative would be to drill
and tap the female connector, so that a ¼ inch barbed fitting screws
into the machine. Not having a ready available means of doing this
work, I opted for the adapter which meant that I could use off the
shelf parts.
Due to the possibility of using off board dry suit inflation, I
needed to move the dilluent connector as high up the rebreathers as
I could. The dilluent connector has its own proprietary overpressure
valve that protects the system against over pressurisation. |
|
 |
|
|
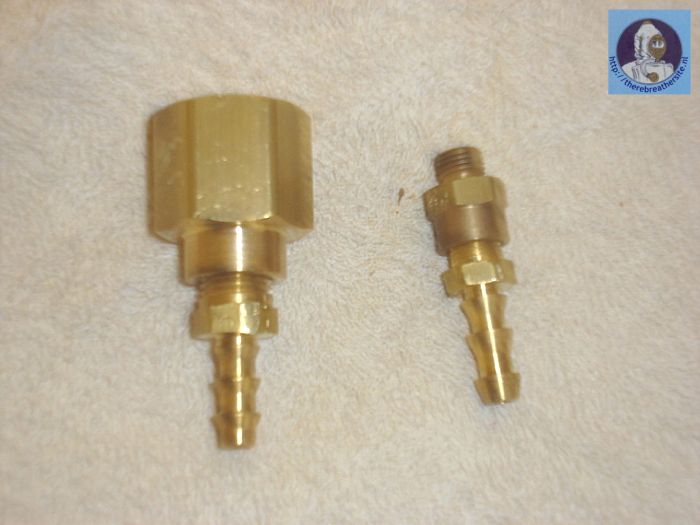
The parts of the Dilluent connector adapter |
|
 |
|
 |
|
|
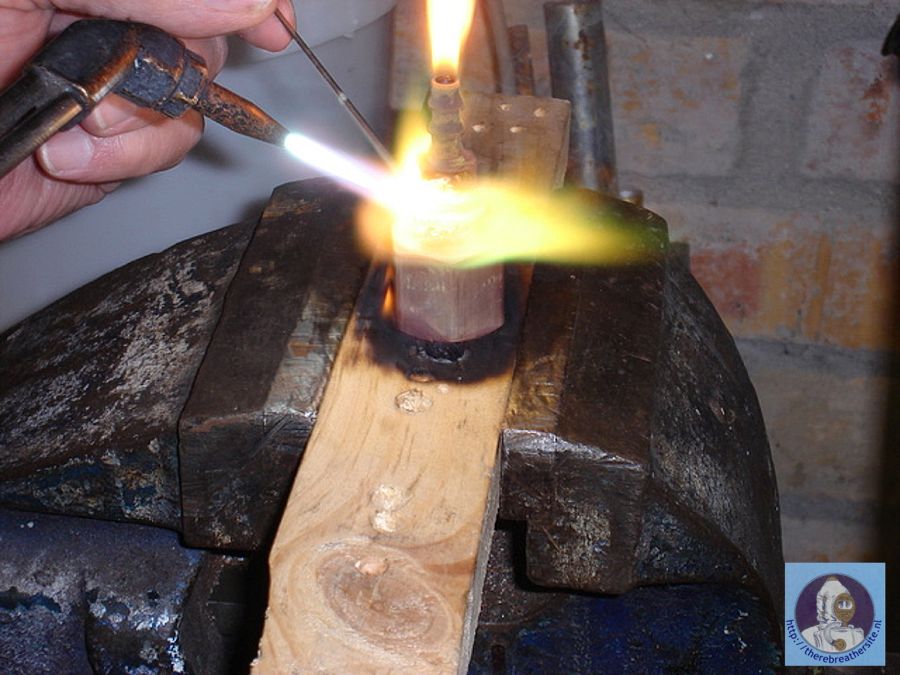
I used silver solder to permanently fix the parts of the dilluent
injector adapter, so as to minimise possible failure points |
|
 |
|
|
The dilluent connector adapter polished and installed. Note the
proprietary over pressure valve |
|
 |
|
|
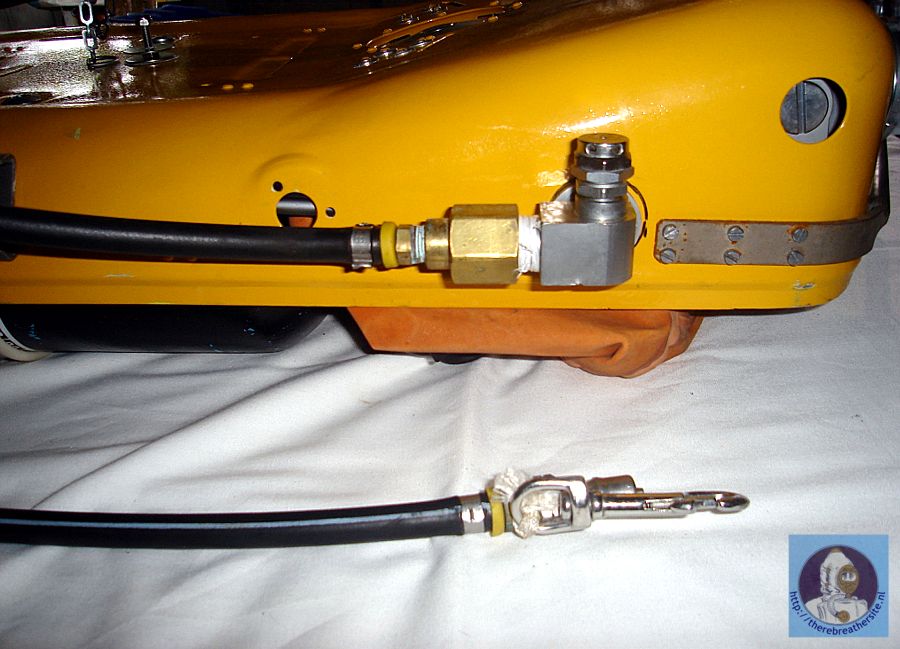
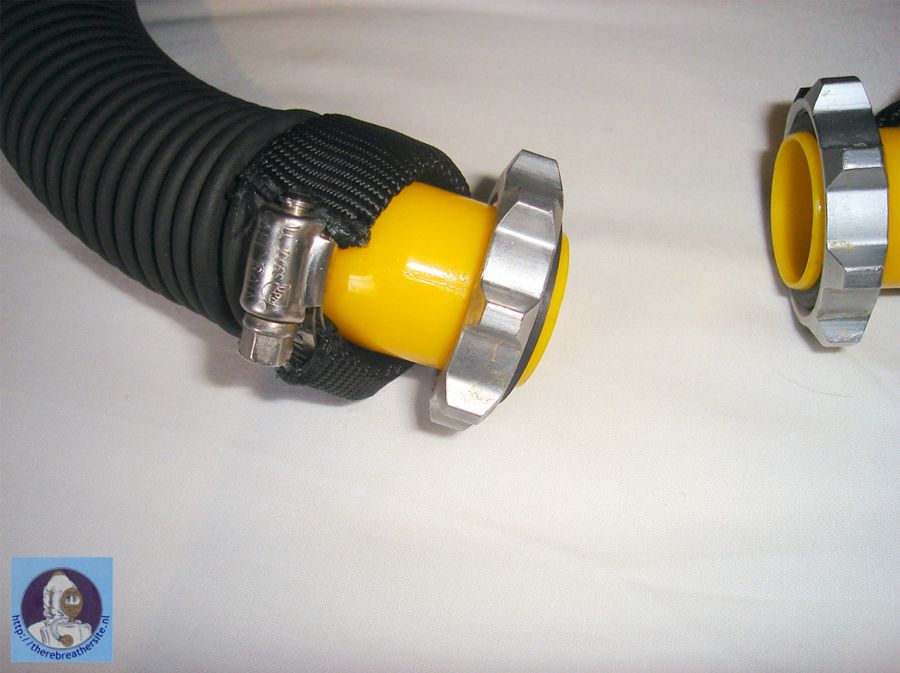
The Quick connect and ¼ inch hose installed. Note the Ferrules used
to clamp the hoses additionally to the gripping power of the
Pushlock barbed system. A bolt snap on the male QC is to secure the
QC when not connected to the Dilluent supply. The original position
of the dilluent injector can be seen to the left of the current one
Important to keep in mind, is that the dilluent not only serves an
important purpose on the breathing gas side of things, but also
drives the important features of the machine. I had to route the gas
supply from the dilluent connector to all the important parts in the
rebreathers. To be able to do that, I needed to build a manifold
that could withstand 11 bar interstage pressure, with enough outlets
to ensure that all the parts that need gas, can receive it.
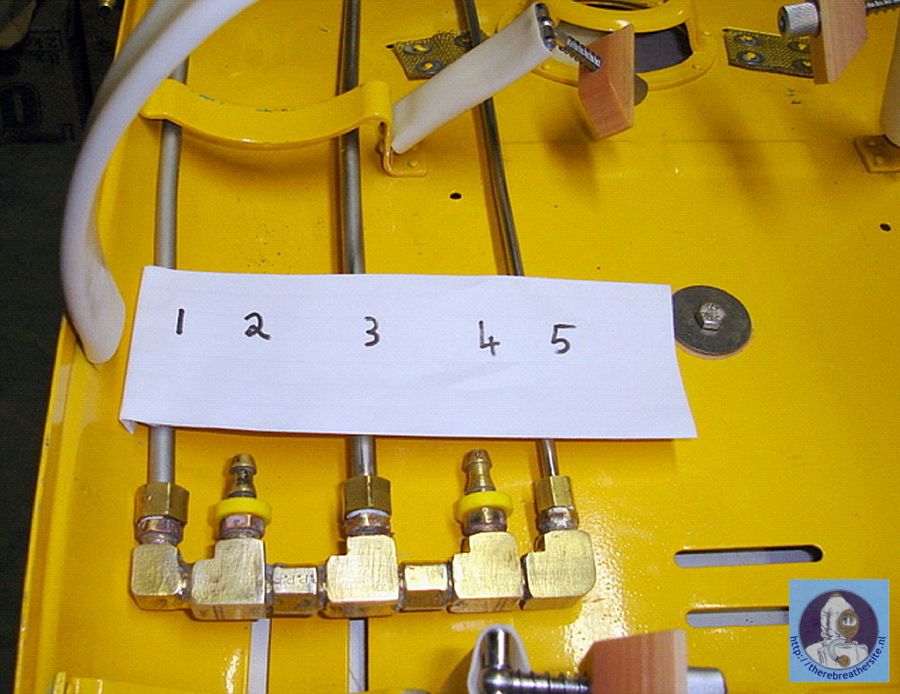
Below is a picture of the dilluent manifold, with a numbered
sequence. The numbers are for explanation of what each pipe does. |
|
 |
|
|
|
|
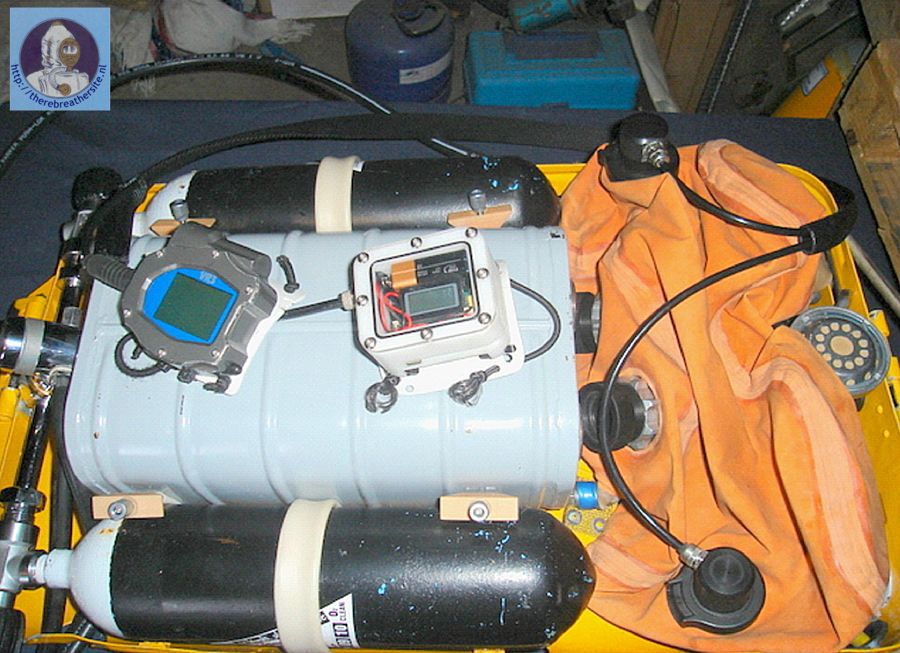
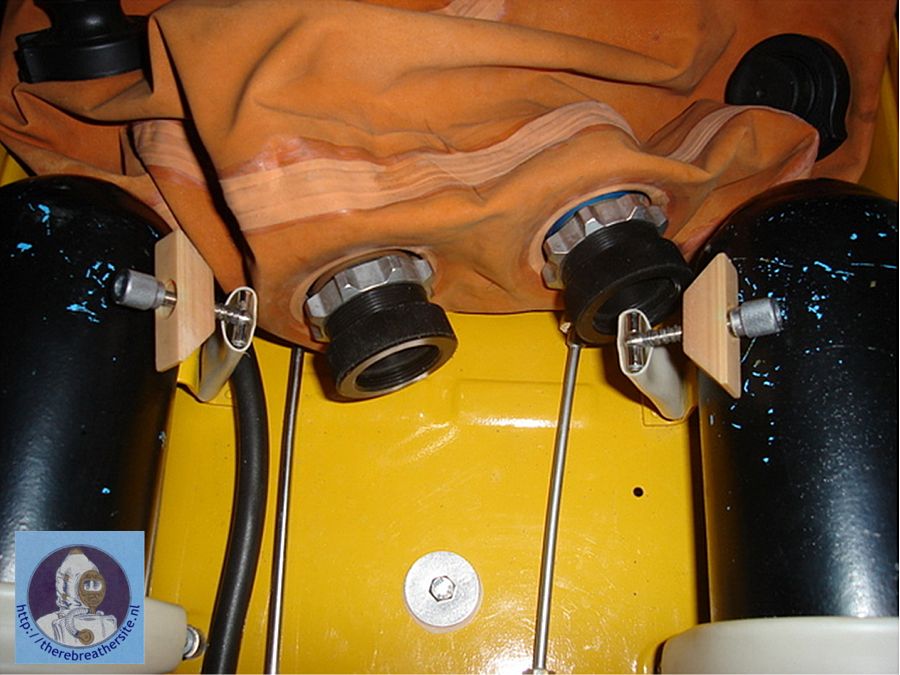
The Oxygen supply and routing
The IDA-72 originally has two x 2L onboard Trimix cylinders rated at
200 BAR. These cylinders are ideal for use as the IDA-72’s onboard
Oxygen supply, (and therefore the colour change, black & white is
the legal colouring for Oxygen). To effectively use the smaller
cylinders in conjunction with the large scrubber, I opted to have a
manifold manufactured to connect the two internal cylinders. The
manifold then allows a capped DS4 to be connected. This gives me a
few options for future use.
I noted that Copper Oxide (the green stuff you see on copper and
brass fittings), may become a problem in future. The alternative is
to have the brass and copper parts chromed. That will be the final
step in the completion of the system |
|
 |
|
|
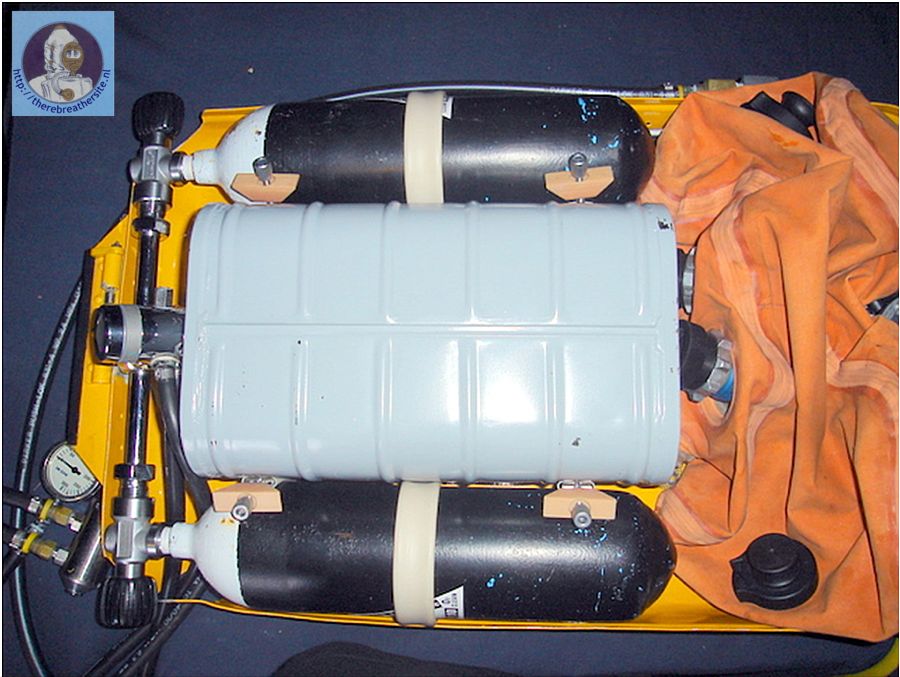
Close-up of the IDA-72 BIG scrubber in place with the Oxygen
manifold and DS4 1st stage |
|
 |
|
|
Close-up view of the Oxygen manifold and capped DS4 The blue
scrubber is a IDA-71 scrubber with a slight modification |
|
 |
|
|
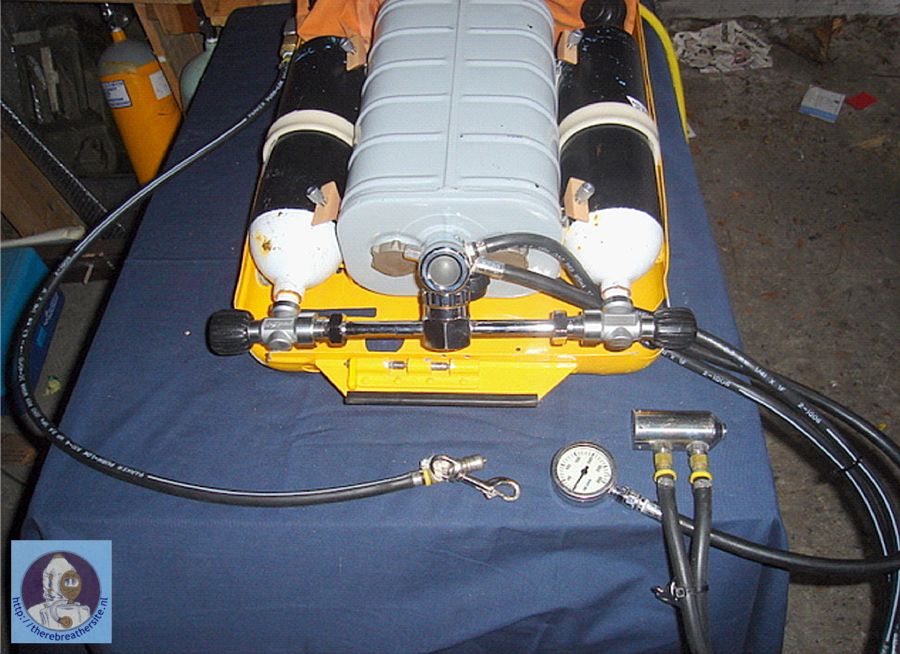
The Oxygen manifold and installed DS4 1st stage is
clearly visible, with the CMF on the right hand side of the table.
The male QC for the dilluent supply is visible on the left hand side
of the SPG |
|
 |
|
|
Close up of the gas supply system. On the left is the Dilluent
manifold, Bottom is the DS4 and the
Hydrogom CMF valve. The hose on the right is
the Oxygen addition to the counter lung from the Hydrogom valve. ;
note the copper oxide already forming on some brass parts. Chroming
of the parts may be a solution |
|
 |
|
|
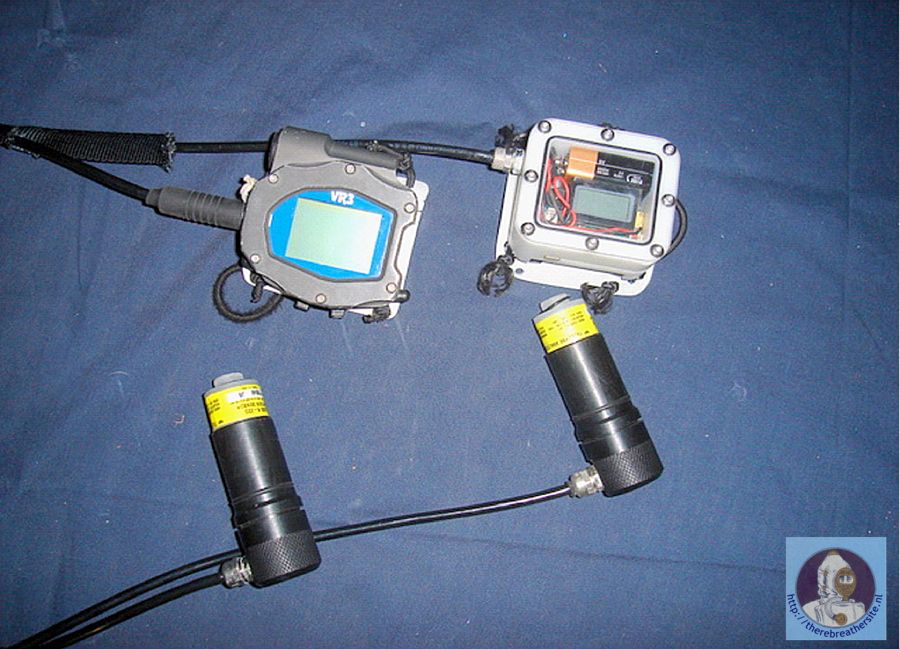
PPO2 Monitoring
The mantra of all Rebreather divers.. “Always know your PPO2”
Although the MCCR IDA-72 uses a CMF (Constant mass flow Valve) to
bleed Oxygen into the loop, it is still vital to be able to monitor
the PPO2 in the system, so that the diver can make the necessary
adjustments to the gas he/she is breathing.
A rebreather is in effect a Nitrox / Trimix factory carried on the
divers back. Using the same tried and tested method used in the
conversion of the “Franken-son” and relatives; I opted for
installing a P-connector system and independent PPO2 monitoring.
The question has always been how many PPO2 displays do you really
need?
I opted for a very simple solution to this perceived “problem”
I installed only two independent PPO2 displays, and my diving
philosophy is simple. If at any stage during the dive, both PPO2
monitors do not give me the same reading, I bail out and do an
ascent on bail out gas, which I carry in an AL-80 cylinder as a
sling / stage cylinder. No discussions, no loop flushes, No funny
stuff. It is just not worth it. – rather come back tomorrow. If my
dive buddy has a problem with that, I will find a new dive buddy.
Two independent R22D Oxygen cells do the monitoring and the displays
are read from two independent monitors.
I am utilising one home built PPO2 display, that a friend of mine
makes, and the second is my VR3 dive computer that doubles as PPO2
verifier and deco calculator. To solve the problem of two cables
coming out of the machine, and lying everywhere except where they
should, the cables are fed through 25mm tubular webbing, which
protects the cable and helps with clean neat routing. |
|
 |
|
|
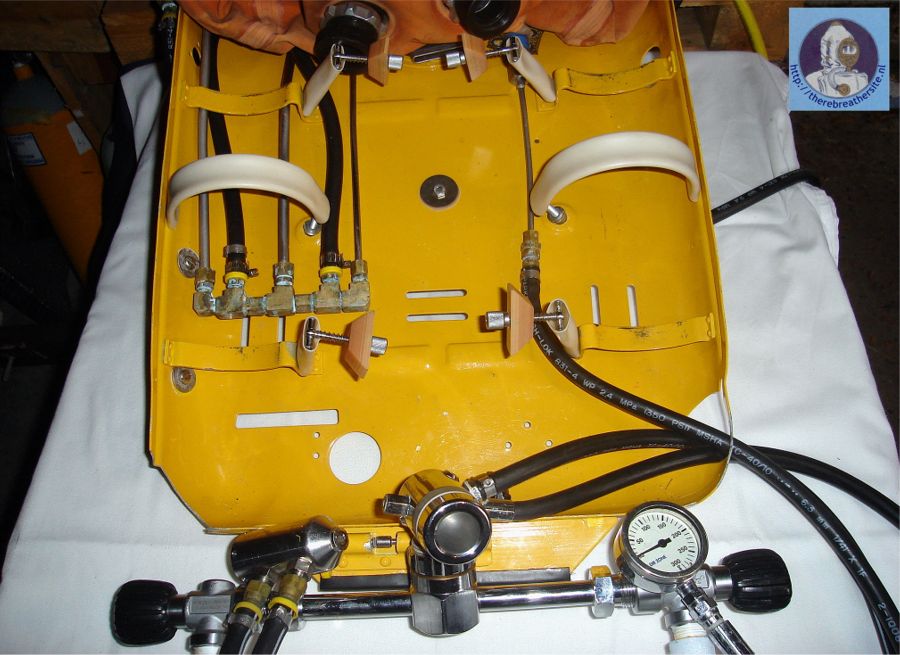
The two Drager female P-connectors installed in the counter lung.
The Oxygen inlet can be seen protruding just under the right Counter
Lung attachment |
|
 |
|
|
Two independent PPO2 monitors (VR3 & home built) |
|
 |
|
|
PPO2 monitoring installed. Tubular webbing can be seen ensuring neat
routing and protection of the monitor cables |
|
|
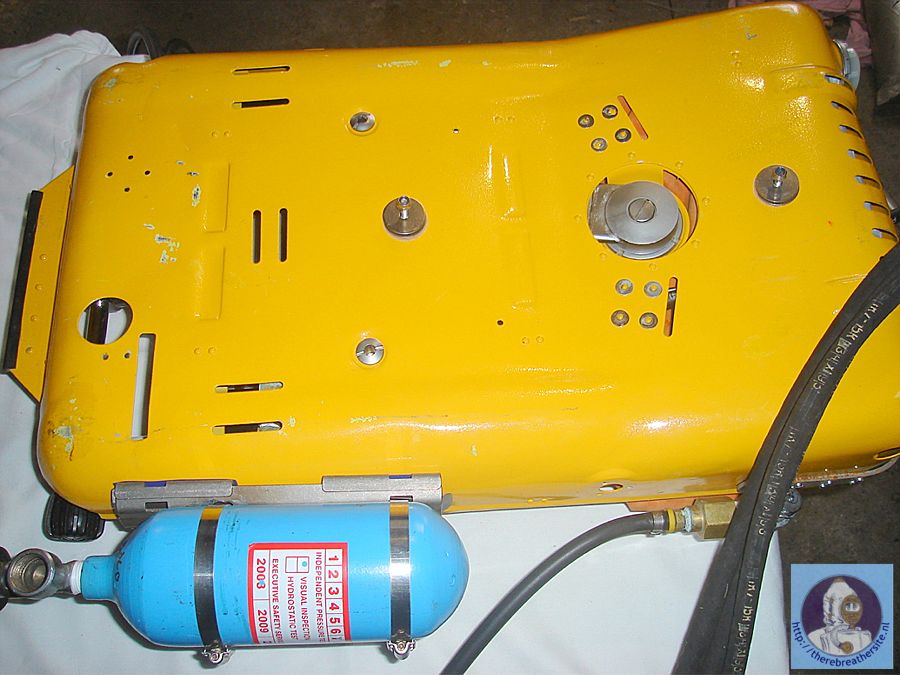
Scrubber Modification
The IDA-72 has a HUGE scrubber. It must be seen to be believed. It
holds approximately 5 Kg of sorb, with dimensions that are about as
big as a shoe box. The 5 Kg of sorb should be equal to about 5+
hours of continuous diving in our cold Atlantic water, although your
mileage may vary.
This is a complete overkill for most sport diving, but the unit was
originally not designed for sport diving. It was designed to handle
the gas volume at 200m which is equal to 21 BAR absolute pressure,
when the diver engages the Trimix bail out option.
This meant that using the BIG scrubber exclusively, would result in
a waste of sorb, as I am not a great fan of re-using and leaving the
same sorb in the scrubber for too long, as it is cheap enough to
warrant often change (well.. cheaper than a life, definitely !)
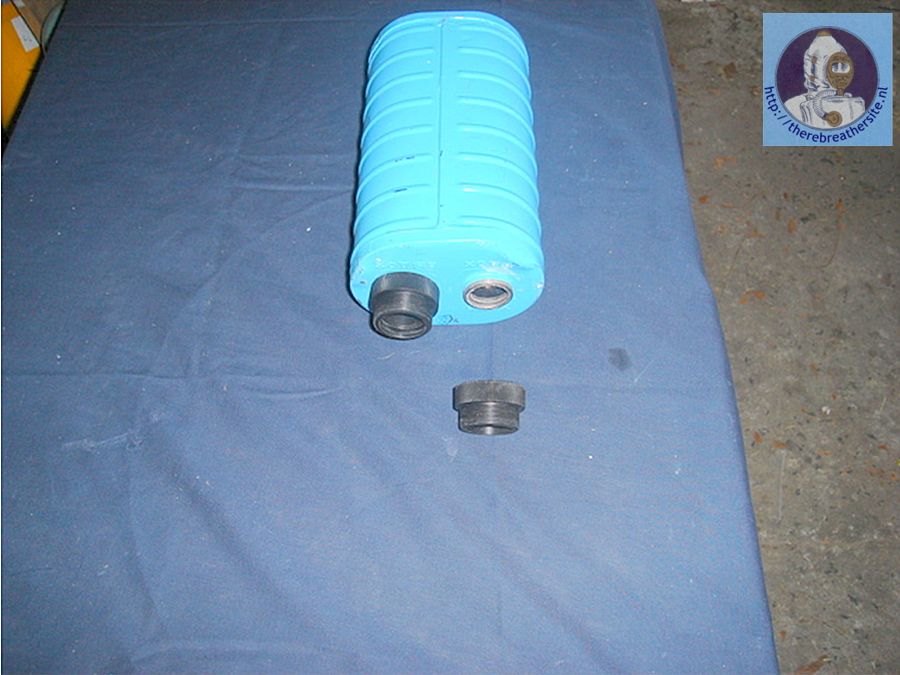
The IDA-71 has a very efficient scrubber canister, which holds
approximately 2.1 Kg of sorb, which is more than adequate for a
weekends’ rebreather diving to depths less than 30m.
I decided to have an adapter made up, to allow me to use the IDA-71
scrubber with the IDA-71. A straight forward fit is not possible, as
the scrubber connection hoses of the IDA-72 are of a much larger
bore than the IDA-71, even though they have the same type thread.
The adapters were turned up from Delrin which screws down on to the
IDA-71 scrubber, and fits the IDA-72 scrubber connector hoses.
This allows me to use a smaller and lighter IDA-71 scrubber for
normal shallow water diving, but still allowing the full use of the
machine’s BIG scrubber for serious deep or long dives, should I
choose to use it. |
|
 |
|
|
IDA-71 scrubber with adapter to fit IDA-72 scrubber connector hoses |
|
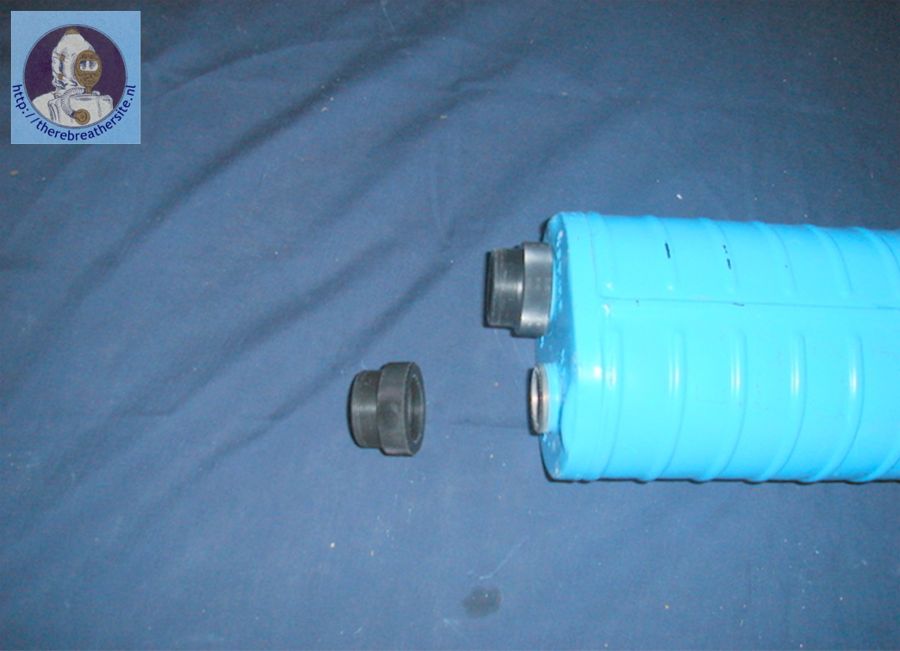 |
|
|
Close up of IDA-71 scrubber with adapter to fit IDA-72 scrubber
connector hoses |
|
 |
|
|
Scrubber connector’s fitted to the IDA-72 counter Lung |
|
 |
|
|
IDA-71 scrubber fitted into IDA-72 chassis with scrubber adapters in
place |
|
 |
|
|
IDA-72 with Oxygen manifold, DS4 and BIG scrubber in place. Gives an
idea of size of the scrubber |
|
|
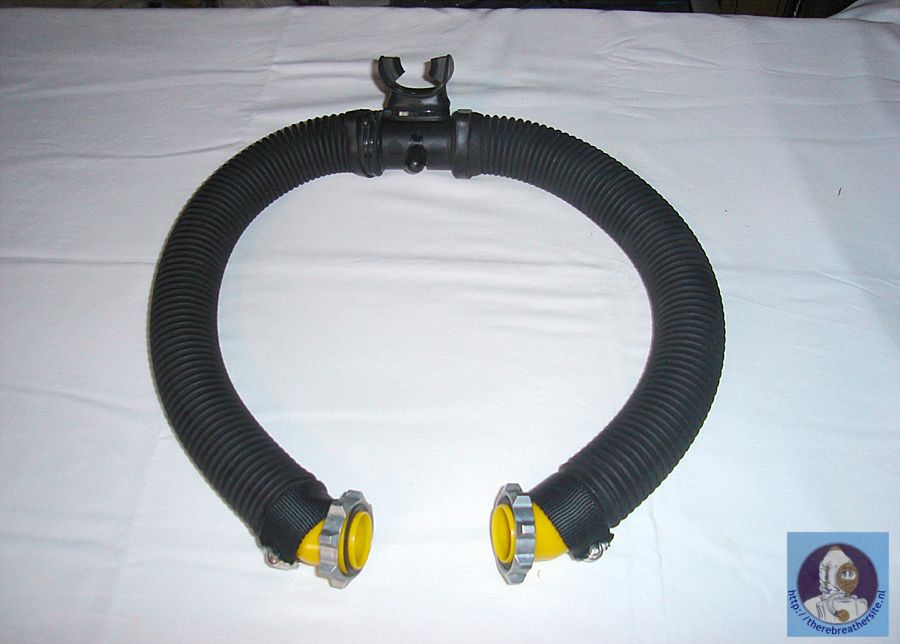
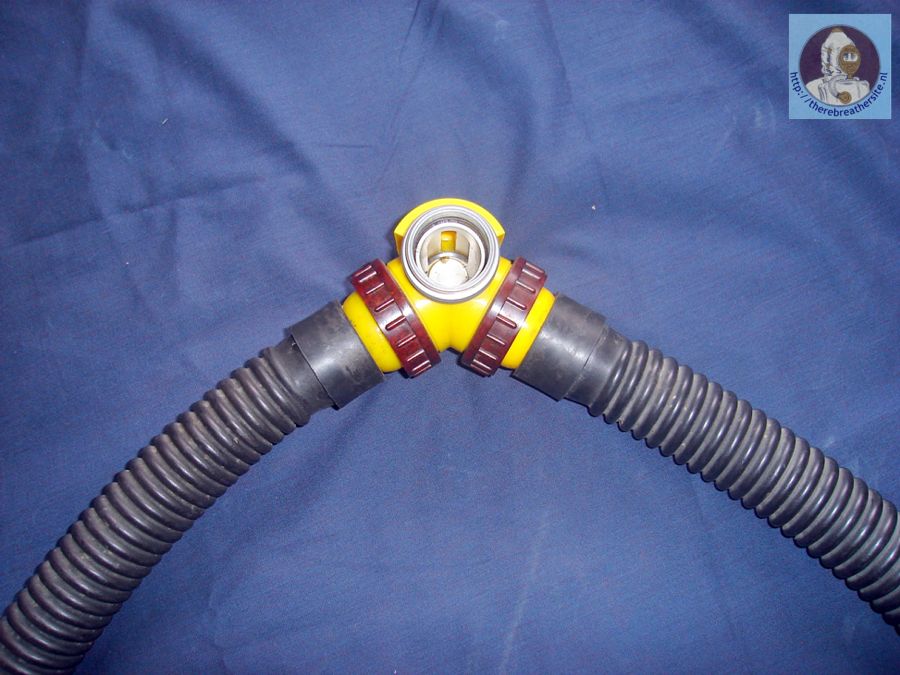
Breathing hoses
The IDA-72 has an interesting proprietary hose system. It consists
of a huge outer hose that serves as a warm water jacket for the
breathing hoses within. The purpose was to warm the divers gas (Heliox)
for breathing purposes. This system is totally unsuited for sport
diving, and had to be changed, unfortunately.
The inner breathing hoses are spiral hoses that are quite stiff and
may be difficult to dive with, if not connected to a helmet of some
sorts. At a later stage I will be connecting my Drager Panorama Full
Face Mask to the IDA-72 and the hoses might be used.
For my current diving needs, I opted to use Drager Ray hoses as they
are easily found and a pleasure to dive with.
The inner diameter of the Drager hoses is also a 100% fit over the
proprietary breathing hose connectors that come with the IDA-72.
I used jubilee clamps (Stainless Steel hose clamps) and tubular
webbing to secure the connectors to the hoses |
|
 |
|
|
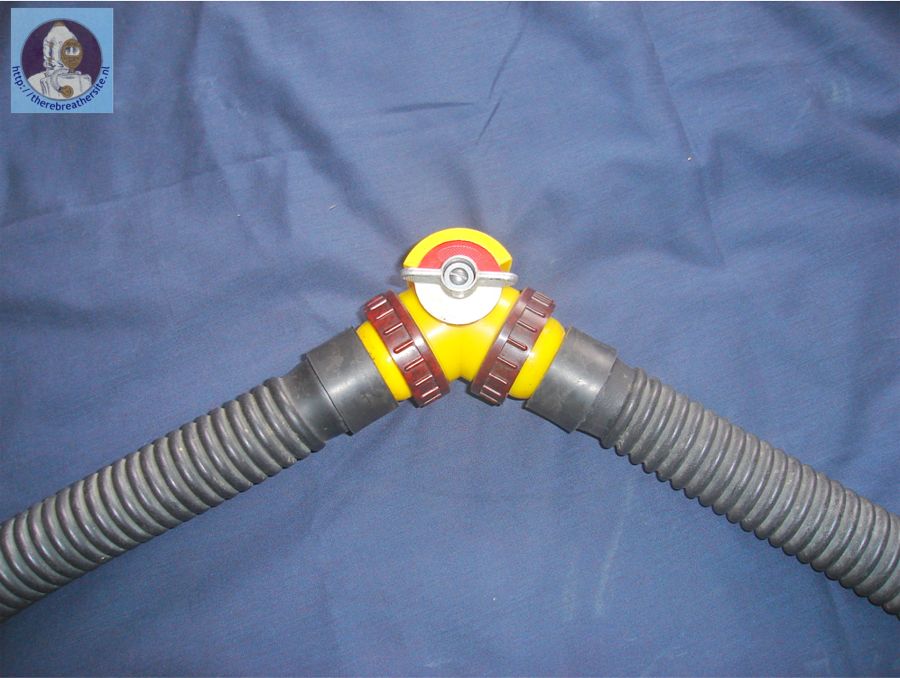
The Drager Ray breathing hoses with the yellow IDA-72 hose
connectors |
|
 |
|
|
Up close of the hose and hose connectors. Note the SS hose clamp and
tubular webbing |
|
|
Drysuit inflation system
Due to our cold water, and taking into consideration the types of
dives that are being planned with this machine once it is completed,
a separate drysuit inflation system will be needed. It would have
been easy to add an additional hose from the manifold, or tee-off
the wing LP hose to include a dry suit inflation hose (another idea
) but due to the fact that Trimix can and will be used in the
machine, it is not such a great idea after all, as Trimix is not
known for it’s insulation properties.
This means that an independent system must be put in place.
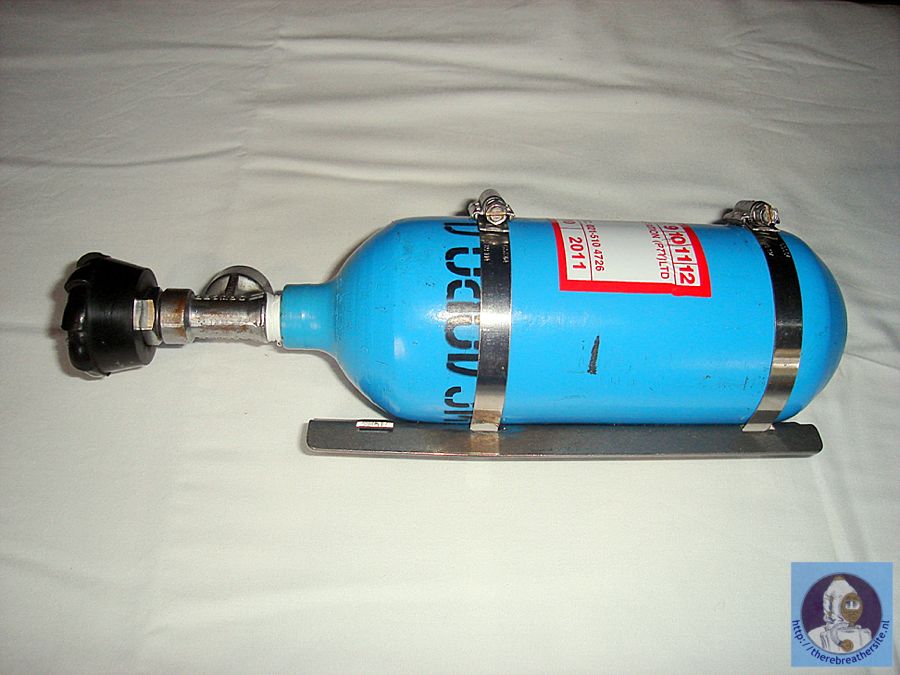
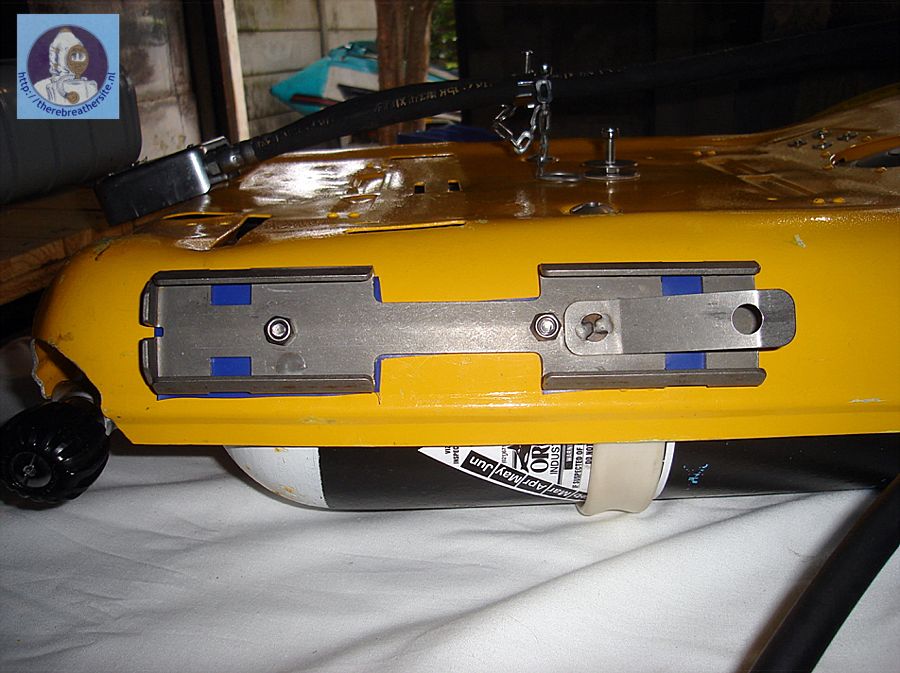
The system consists of a set of “G” clamps and my IDA-71’s 1L Oxygen
cylinder and a Drager Kleinkonisch pillar valve.
The female “G” clamp is secured to the IDA-72’s chassis with
recessed machine screws and nuts. Care was taken to ensure that all
the dissimilar metals were “insulated” so as to prevent dissimilar
metal corrosion. The IDA-71 cylinder neatly slides into the female
“G” clamp and a Drager Kleinkonisch pillar valve does the rest.
The cylinder colour (light blue) is close enough to our legal
colouring for Argon, which is referred to as Peacock Blue.
The cylinder sits on the left hip, behind the wing and will be
filled with either Argon, or Air and will have its own 1st
stage regulator. |
|
 |
|
|
IDA-71 Oxygen cylinder with male “G” clamp |
|
 |
|
|
Female “G” clamp on the left side of the chassis. Note the blue PVC
inserted and neatly trimmed following the edges between the “G”
clamp and the IDA-s body, to prevent dissimilar metal corrosion |
|
 |
|
|
The drysuit inflation cylinder installed, ready to go, just add 1st
stage |
|
|
Wing and harness
The IDA-72, like the IDA-71, is contoured to fit the divers back
profile. It is therefore very difficult to attach a stainless steel
backplate to the IDA-72.
The proprietary harness that came with the IDA-72 is incomplete,
which I believe it to be the case, rendering it basically useless
for our use. So it had to go…
By inserting strategically placed 6mm stainless steel bolts, an
Oxycheg “O” pack can be bolted securely to the back of the IDA-72.
The “O” pack is a soft, but very strong nylon backplate that is
perfectly suited for the purpose.
The wing is a 50Lbs (22 Kg) lift double tank wing that provides more
than adequate lift for the machine during a dive.
The harness is in the Hogarthian gear configuration, leaving ample
place to attach bailout cylinders, dive lights etc |
|
 |
|
|
Harness webbing and soft “O” pack |
|
 |
|
|
6mm Stainless Steel bolts and nuts to secure the webbing harness,
once again all dissimilar metals have been “insulated” |
|
|
Bail out regulator / Full Face Mask
Currently the Machine has a bungeed bail out regulator, which is fed
from the Dilluent manifold. It is not the ideal solution, but as
with most works in progress, it is a start. It is important to
realise the shortcomings of the system, although the ability to
switch to OC mode is a great asset, inherent to the machines
original design.
I plan to do all my rebreather diving with a FFM, and to be able to
use the FFM, the following modifications have been done.
The IDA-72 DSV is a very nice designed piece of equipment but it is
definitely designed to fit onto a helmet of sorts.
I decided to use a FFM with the IDA-72, and possibly utilising the
proprietary DSV and spiral hoses, if the hoses prove to be
comfortable to dive with. Doing this would serve the purpose of
adding more of the original flavour to the diving machine, without
increasing the conversion costs.
|
|
 |
|
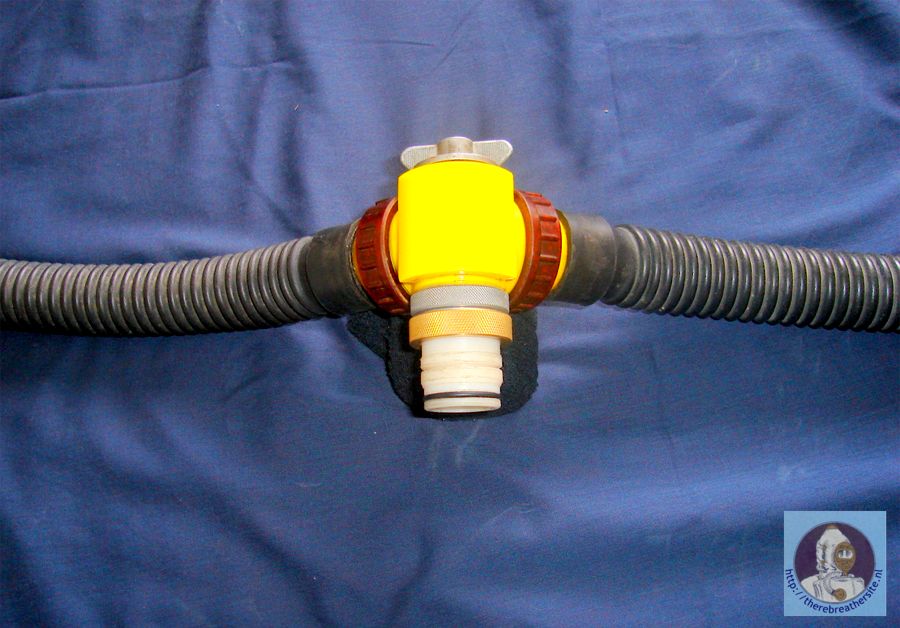
|
IDA-72 DSV view from the front. The metal ring can be seen, with
thread, meaning that a connector from a diving helmet must have
screwed onto the DSV |
|
 |
|
|
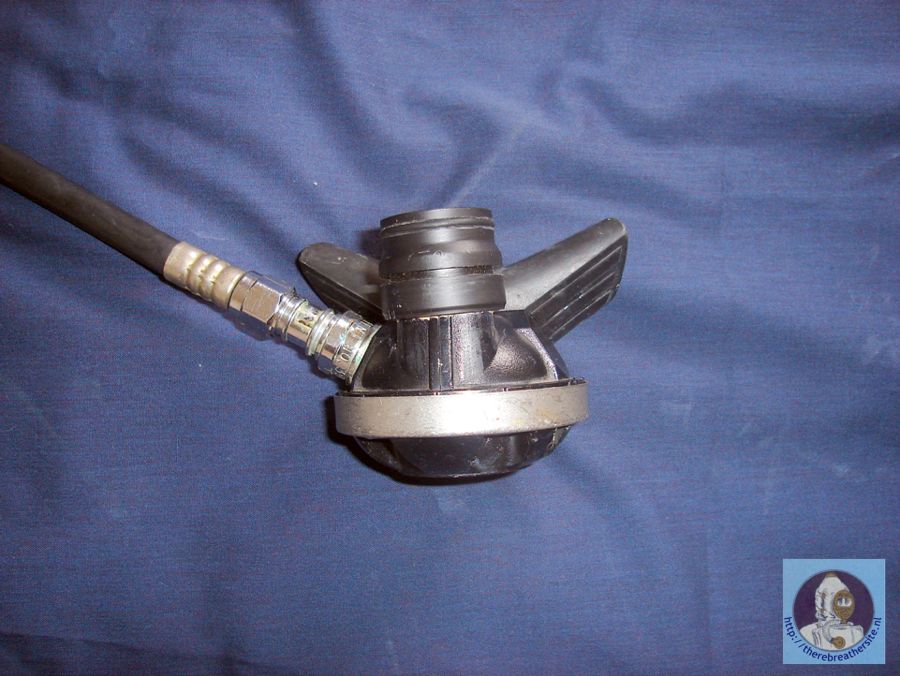
IDA-72 DSV viewed from behind. Note the big turning
knob. |
|
| (DSV = Diver Surface Valve) | |
|
The movement of the DSV is fluid and is a half turn to either side
for open or closed positions. Unlike the Dräger DSV, there is a
large “hooded” vent on the top of the DSV. Opening the installed DSV
to surface air, makes breathing thought the FFM and installed DSV
very easy.
The DSV was definitely not designed to be removed from the helmet
during diving, as you would do with a normal DSV in case of a bail
out scenario. That would explain the need for an OC bail out
function, such as provided by the Belt switch Block.
So does form follow need or
visa versa?
As the machine did not come with a helmet (probably stored on the
same Nuclear submarine of sorts as the male Umbilical connector) I
had to turn to invention, to solve the problem of making all the
parts fit.
An engineering company who are always eager to help us divers with
our little projects turned a DSV-P-Port connector and a locator ring
based on my description. |
|
 |
|
|
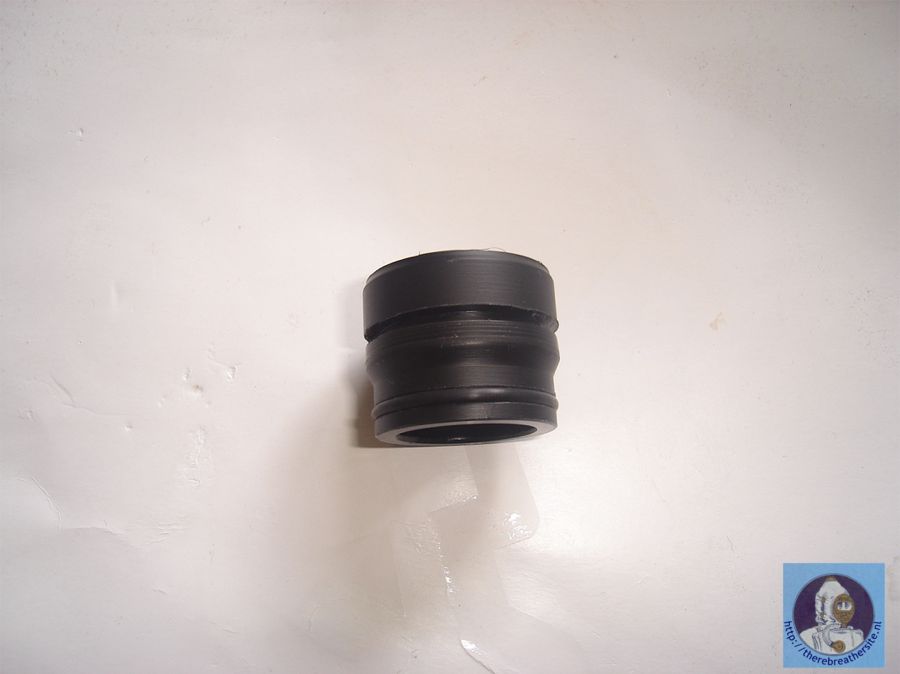
The prototype DSV – to - P-port connector and locator ring |
|
 |
|
|
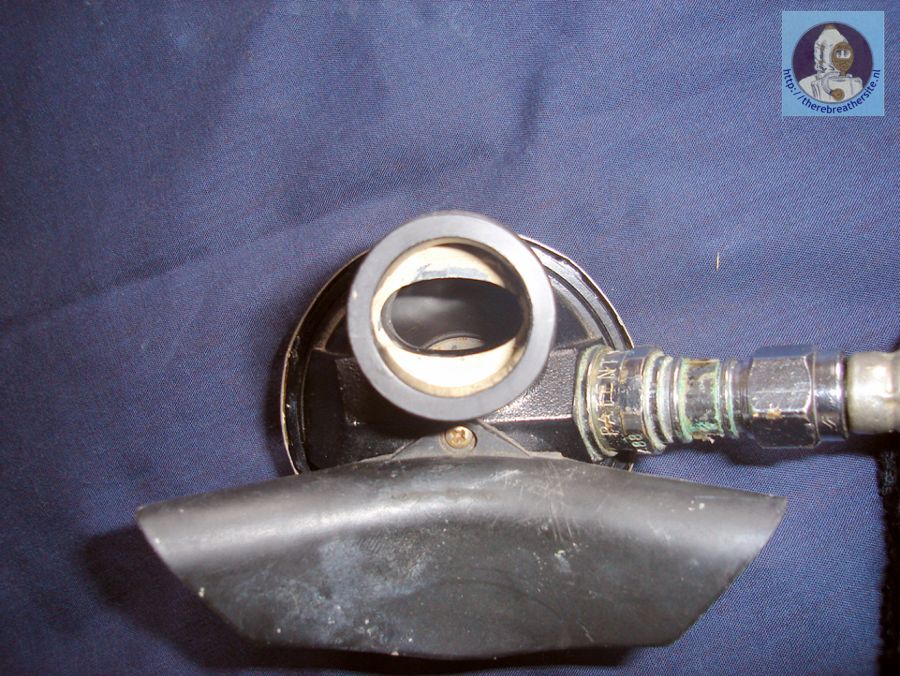
The DSV – P Port connector installed in the IDA-72 DSV ready to be
mounted in the Drager FFM
Not having a ready supply of Drager Shark regulators,
or a convenient C&C milling machine, I had to come up with an idea
of how to convert a normal SCUBA 2nd stage DV to a DV that will be
able to connect to the Drager Panorama FFM.
I had shortened male Drager P-port adapters turned from
Delrin (Acetal) that would serve the connecting purposes.
|
|
 |
|
|
Turned up shortened Dräger
male P-port connector
The P-port connectors were mated to a normal SCUBA DV with the use
of a file and some “Pratley
Putty”, which are two chemicals, in the form of pliable “play
dough” sticks, that once combined in equal quantities, after 10
minutes or so, becomes rock hard and NEVER lets go.
The file was used to take the edges of the oval connector where the
SCUBA bite piece is cable tied on. This resulted in a 100% fit
around the sides, as the round P-connector is fitted over the SCUBA
DV mouth piece.
The Pratley Putty sealed the flat sides of the oval mouth piece and
is responsible for holding the system in place.
I tried to dislodge it, but found it cannot be done, not without
some serious use of excessive power and maybe tools |
|
 |
|
|
The P-port installed on the SCUBA DV |
|
 |
|
|
Close up of the inhalation side of the DV. The Pratley steel can be
see around the oval opening, keeping the system together |
|
|
All that is left is to install all the
elements and bring the system together. |
|
 |
|
|
The DSV installed on the
Dräger
Panorama FFM |
|
 |
|
|
I would like to thank Johan Pretorius for sharing his project with
us! If you have any questions don't hesitate to contact me |
|
| published 01-12-2008 | |
|
More Sources: |
|
| Please sign my Guestbook | |
| Email: jw.bech@quicknet.nl | |
Johan Pretorius rebuild the Russian IDA-72 to a manual operated closed circuit rebreather. He modified the scrubber system in such way the rebreather can be used for both short and long dives. He also changed the loop to fit a full face mask. Here you find his detailed description
Mainmenu:
Search this Website
Information about RB
Photo galleries
Historical Information
Links & Downloads
Reviews
Homebuilders
Electronics
Updates, speed menu
Web shop
Reviews SC rebreathers
Reviews CC rebreathers
RB’s through the ages
Inspiration rebreather
Database Oxygen RB’s
Database Semiclosed RB’s
Updates
Speed menu
Search this web
