|
|
|||||||
|
|
|
||||||
FULL VOTING LOGIC 3-SENSOREN DIGITALE CCR CONTROL Door een constant gebrek van de fa. Juergensen in Pennsylvania USA naar elektronica voor hun Mark15, 15.5 en CCR-1000 Rebreathers hebben zij in eigen beheer een volledige module gebouwd voor het regelen van Closed circuit rebreathers (Juergensen maakt van huis uit OW films, zie website). De regeling heeft een LCD display en een Full logic control regeling. De module wordt in kleine series gebouwd en is nu voor elke duiker te koop! De module kan voor elke CC rebreather werken. De regeling kan een 6 volt solenoid aansturen. Eveneens bijzonder handig is dat de zuurstofsensor output vrijwel altijd binnen het bereik van de regeling werkt. De module werkt met cellen in de range van K-1D tot R-10 en alles ertussen in. Als je overweegt een CCR te bouwen is dit wellicht de ideale module. Lees hieronder hoe de elektronica werkt |
FULL VOTING LOGIC 3-SENSOR DIGITAL
CCR CONTROL In response to our continuing need for electronics to
supply controls for the Mark 15, 15.5 and CCR-1000 Rebreathers, Juergensen
has developed a fully functional Digital CCR control with LCD Readout, and
now make this available to divers worldwide. Yes - this will work with just about ANY Rebreather.
It will drive a 6 volt Oxygen Solenoid (also available), and will accept
Oxygen Sensor output from just about any Sensor (from an K-1D to a R-10,
and everything in-between). If you are a Homebuilder, and want to move up
to automatic CCR control, then this is for you. Read below for a full description of how these new electronics work: |
||||||
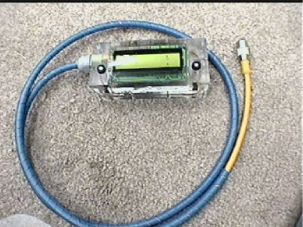
| Hier zie je een foto van de
complete unit, uitgevoerd met de POD, geconstrueerd voor gebruik met de
Mark 15 CCR. Let op: de module voor deze unit is exact 50,80 x 57,15mm (zie foto) laat je niet misleiden door de afmeting van de POD. Het circuitboard is extreem klein en werkt 50 uur op een normale 9 volt batterij! De Module bestaat uit de print, een HUD (head up display)print, plus een 2 x 16 LCD scherm in een doorzichtige lexaan behuizing |
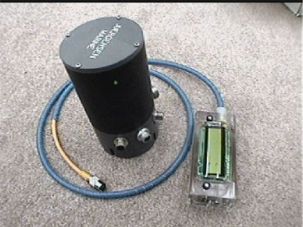 |
Here is a picture of the complete
unit, equipped with a POD for use with the Mark 15 CCR.
NOTE: The Control Module for this unit is EXACTLY 2 inches by 2 1/4 inches (SEE PICTURE) - don't let the size of the POD fool you - this board is extremely small, and can operate for about 50 hours on a single 9v Battery! The unit consists of the Control Board, a HUD Board, plus a 2 x 16 LCD encased in a clear Lexan Housing
|
|||||
 |
|||||||
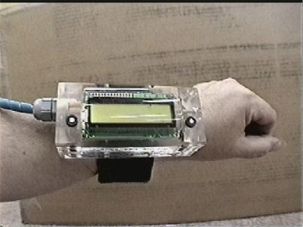
| Voor diegene die in het bezit is van een Mark 15 Series Rebreather (mocht je in Nederland wonen stuur me even een mailtje!), hier zie je dan de basis van de module uitgevoerd met de onderwaterconnectors. |
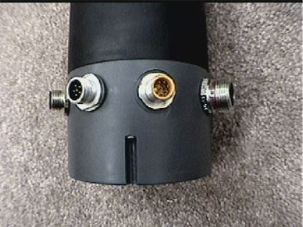 |
For those of you who have a Mark 15 Series Rebreather, this is a view of the base of the pod with the underwater connectors. | |||||
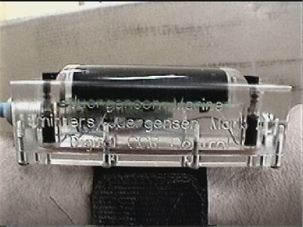
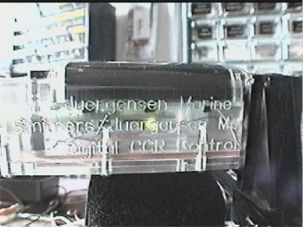
| Juergensen plaatst op elk van hun producten de firmanaam. Zij staan garant voor de inhoud! |
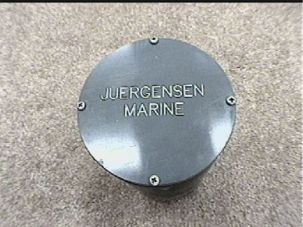 |
We put our name on every product we make, so you know we care about what goes inside. It's that simple. | |||||
| Dit is de LCD Module in de doorzichtige Lexaan behuizing. Je kan zien dat er twee hermetisch gesloten waterdichte schakelaars zijn aangebracht. De linker schakelaar is voor het Backlight, de rechter om de menukeuzes te maken. Beide dienen echter aangedrukt te worden (gelijktijdig) om ongewenste wijzigingen door stoten onmogelijk te maken. |
 |
This is the LCD Module in the Clear Lexan Housing - you can see we have incorporated 2 Hermetic Switch sealed elements for the push buttons. One controls the Backlight, and the other controls the Menu. Both are used to call up menu items, and then to confirm your required changes - there is no "accidental" changes made by bumping a button against a reef or wreck. | |||||
| De behuizing bleek het moeilijkste te maken tot
nu toe. Het ontwerp is gemaakt in doorzichtig lexaan met reden: Het
gedeelte voor de LCD is een Convex Lens waardoor de uitlezing aanzienlijk
wordt verbeterd, iets waar de "oudere" klanten extra blij mee
zijn... Om verder zeker te zijn van een optimale afdichting van de behuizing is het binnenwerk geheel gevuld met een diëlectrum (geen stroom geleidende vloeistof). Hierdoor kan de unit op grotere diepten functioneren dan waar wij willen zijn....... |
 |
This housing is the toughest we've come up with yet. We
designed it out of clear Lexan for a reason: The Window of the housing is
actually curved at a precise degree, forming a convex lens which MAGNIFIES
the LCD Character Display - something our, ahem, "older"
customers may particularly appreciate!
To further ensure the integrity of this housing and the LCD encased within, we also fill the entire case with a dielectric fluid so that this wrist unit can dive deeper than most of us would ever dare.
|
|||||
| Door hier weer de naam op het product te zetten
kunt U de naast geschreven tekst vernemen dat de firma ook erg blij is met
de inzet van Alex Varouxis of Associated Design die heeft geholpen met dit
ontwerp en eveneens Will Smithers († 2002)
bedanken als genie achter hun
elektronica producten. Anything worth owning in the dive business is usually the product of more than one man's vision or expertise. Our philosophy is that by combining the talents of others with our own vision, we create a better, more reliable product. |
 |
Once again, you will see our name on this unit.
We are very proud of the work that went into this design, and want to give
our sincere thanks to Alex Varouxis of Associated Design who helped create
it, as well as Will Smithers († 2002) for being the genius behind all of our
electronic products.
Anything worth owning in the dive business is usually the product of more than one man's vision or expertise. Our philosophy is that by combining the talents of others with our own vision, we create a better, more reliable product.
|
|||||
| Nu na deze filosofie maar eens kijken hoe het
werkt:
Gedurende het opstarten zal je zien dat de Oppervlakte Interval Timer(SIT) op 00:00 is
gezet, er is nog geen setpoint geselecteerd (het
lege veld rechts van de SIT),, tevens wordt nu actief gelezen wat de
cellen afgeven. Dit is zichtbaar door de drie *** sterretjes. Mocht een
cel defect zijn zal op deze plaats een X verschijnen, hetgeen betekend dat
de Full logic deze cel heeft weggestemd. Bijvoorbeeld **X De onderste regel geeft de maximum diepte en rechts daarnaast de drie real time uitlezingen van de zuurstof sensors.
|
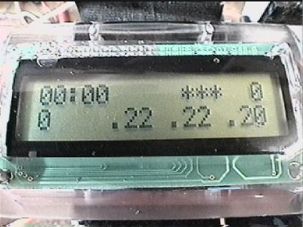 |
Now on to the works of the thing:
Upon power-up, you will notice that your Surface Interval timer is set to 00:00, there is no Set-Point yet selected (the empty field just next to the Surface Interval Timer), all three sensors are currently being read by the electronics (the three ***) - If any one sensor is "Voted Out" by the electronics, a "X" will appear in it's spot instead of an Asterisk. The next spot, where there is a "0" on the screen is your Dive Time - as you can see, we haven't gone diving yet. Moving down to the next line, we have your Maximum Depth, and the three Real-Time readings of your Oxygen Sensors.
|
|||||
|
Zoals je hier kan zien, wordt in 100% zuurstof elke sensor
volledig weergegeven. Enige afwijking van de sensor kan door de duiker
direct worden waargenomen zonder de noodzaak van een tweede display. |
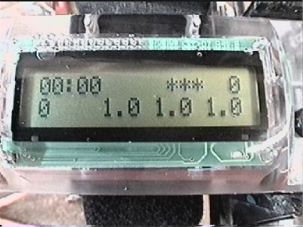 |
As you can see here, in 100% O2, they list each sensor. Any deviation of any one Sensor can be detected this way immediately by the diver, without a need for a Secondary Display (even though the use of one IS a requirement of ANY CCR diving). |
|||||
| Hier drukt een vinger om de menumodus te activeren. De menukeuze wordt weergeven tussen 00:00 en ***. Bij elke nieuwe druk op de knop verschijnt de volgende menukeuze. Ook kan de knop ingedrukt worden gehouden dan wordt er door het menu gescrolld. De menu keuzes bestaan uit Set-Points 0.4-0.7-1.0-1.2-1.4, MAN voor handbediening, en aan de oppervlakte CAL. |
 |
Here is a finger pushing the Button to select the Menu Option. When you press this button, the Menu (located in the spot used by the Set-Point - in between the 00:00 and ***) will scroll with each push of the button (or automatically when held) through the available selected Set-Points of .4, .7, 1.0, 1.2, 1.4, MAN (For Manual Control), then if you are on the surface - CAL. | |||||
| Als je kiest CAL ( kalibreren), zal de unit je een aantal handelingen voor stellen. Door deze handelingen te verrichten wordt de kalibratie uitgevoerd. |
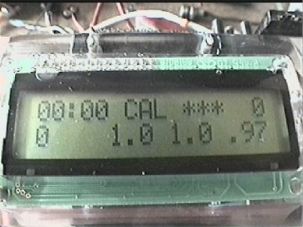 |
When you select "CAL" (for "Calibrate) the unit will prompt you through the Calibration Procedure. | |||||
| Zo wordt er gevraagd de loop met 100% zuurstof te vullen ( en het minimaal 3 x te spoelen)voordat met de kalibratie kan worden doorgegaan. Dit garandeert dat de DUIKER de volledige controle over de kalibratie heeft. Je moet handmatig zuurstof injecteren, en het minimaal 3 maal spoelen. (je kan het ook slechts 1 x doen, alleen wordt drie keer aanbevolen) |
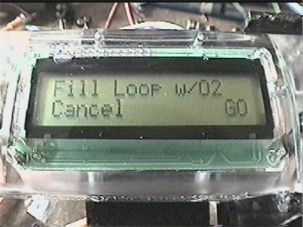 |
It prompts you to fill your loop with O2 (and then flush it at least 3 times) before proceeding to the Calibrate function. This ensures that YOU have control of the calibration process. You must manually inject Oxygen into your loop, then flush it out at least THREE times (you can do it only once, but three is recommended). | |||||
| Zodra je hiermee klaar bent druk je op de knop "GO" |
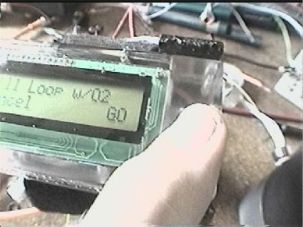 |
When done, you press "GO" | |||||
| De unit zal zichzelf dan automatisch kalibreren |
 |
The unit will then start calibrating itself. | |||||
| Er zal een melding verschijnen dat de kalibratie is voltooid en de unit klaar is voor de duik |
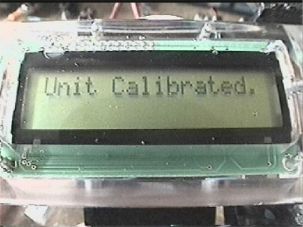 |
It will then inform you that it is Calibrated and ready to dive. | |||||
| Aan de binnenkant van de lexaan behuizing heeft Juergensen als Bonus een driekleurige LED geplaatst. Deze led geeft je een visuele indicatie van de ppO2 zonder maar op je primaire display te hoeven kijken. Op deze wijze wordt door gebruik te maken van een Secundair display een drievoudige redundantie bereikt! Iets wat geen andere rebreather ter wereld heeft te bieden! |
 |
Inside the Lexan Housing is mounted a Tri-Color LED which coupled with the HUD Electronics in the POD gives you a visual reference as to your exact ppO2 without even having to look at your Primary Display. In this way, coupled with a working Secondary, you have TRIPLE Redundancy in your Oxygen Display System. No other rebreather control on EARTH offers that kind of redundancy out of the box. | |||||
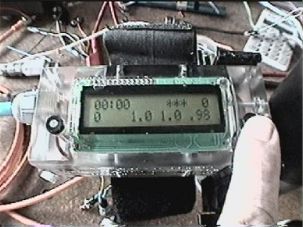
| Hier is de unit gedurende een duik. Je kan de
huidige diepte (98FSW) aflezen, de maximaal gedoken diepte MDD (114FSW),
de drie sensor uitlezingen (1.0, 1.0, 1.0) en de verstreken duiktijd (DT)
in dit geval 0 minuten. Setpoint 1.0. *** = alle drie de sensors OK |
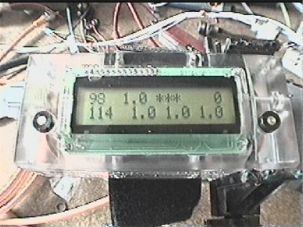 |
Here is the unit during a dive - you can see your Current Depth (98 FSW), your Maximum Depth (114 FSW), your three Sensor Readings (1.0, 1.0, 1.0) and your elapsed Dive Time (in this case, 0 - since we took the picture too soon after taking it down for a dive!). | |||||
|
Klik op het logo voor de site van Juergensen Marine Klik gele tekst voor email |
|
Click the logo for Juergensen Marine |
|||||
|
I wish to thank Bob Howell for telling me about Juergensen, and Kevin Juergensen for his permission for publication |
|||||||
|
Laatste ontwikkelingen: Eveneens uitvoeringen voor Nitrox en Trimix Diluent! |
|
Latest devolopment: Also Nitrox and Trimix diluent versions available! |
|||||
|
|||||||