Hippocampus Celti

The amazing MR. Tom Rose Presents:
Endgame...Closing in on the perfect rebreather for me. A Kiss type
Closed Circuit Rebreather with dual oxygen sensors weighing ~26 pounds
allowing about three hours in the water with depths to 140 feet. A history
and breakdown of the system.

- Warning....If you have a deathwish, dive a rebreather...The graveyards
are full of those who have died on rebreathers. Damned good open circuit
divers have died, damned experienced divers have died, and more will die.
All rebreather dives are experiments and some experiments fail. These life
support systems are really dangerous. I recommend that you get your
rebreather pleasure from reading about the exploits of others and not by
trying to copy what I have done. It just isn't safe.
My first recent brush with a rebreather early in 2001 was a simple system. My
operational plan was to develop a system that would meet my diving style as
a reef inspector with video and still camera in hand. This meant diving to
less than 100 feet of sea water (most of my diving is in less than 40 feet
these days) with the quiet of a bubble free underwater life support system.
Other goals of the project were longer dives, less decompression obligation,
and a lighter weight dive apparatus. My current interest is not in a
computer controlled system although that is easily within my reach. I am
content to use a constant flow (.9 liter per minute) of oxygen, dual
displays of PPO, and manual addition of oxygen or air for the necessary
Nitrogen at depths below 20 feet. Another design goal was to minimize the
need for tools for assembly, disassembly, and service. I knew I would have
to crawl before I walked so I took my time and explored a lot of options.
These experiments and projects can be found on
my rebreather pages.
Along the way, I got encouragement, help, and a lot of kidding from a number
of persons, generated a patent pending with Dr. Bob of the world famous CEDU.
Got the excuse to do a lot of extra diving, played in the shop, stretched
the mind muscles and made a lot of rebreathers and new friends. A great year
and a half. I am pretty sure that I now at endgame. Is is perfect....heck
no. Does it dive well...it certainly does. Did I meet my all my goals...yes
I think I did and had a lot of fun along the way.
As I look at the 26 pound package with a 3+ hour dive time at proven depths
of 85 feet by me (and 140 feet by Ken Swain), it is pretty simple...I almost
ask myself, "Why did it take so long?" I know the answer...ideas start out
simply...get complicated...and as you progress in your knowlege...can get
simple again. In my case the destination was only part of the prize, the
journey was the bigger part. How much did it cost? My best estimate of parts
I purchased goes to around 3,000 dollars and hundreds of hours. If I had
gone directly to the final configuration the costs would have been less than
$800.  I now have the
parts to build two more of these systems...one for my daughter and one for
my son and still have a number of replacement parts for the future.
Considering the fun I had, that is a good deal. I now have the
parts to build two more of these systems...one for my daughter and one for
my son and still have a number of replacement parts for the future.
Considering the fun I had, that is a good deal.
I started this with a East German military surplus RGU pure oxygen
rebreather. I purchased the first one off Ebay from Harbour
Supply...eventually I bought 5 of them for parts. I ran to the pool to do my
first tests. Learned about leaks a lot that day... My first modification was
to paint the cover reducing that military look. I made a lot improvements to
the RGU as it was manufactured by changing the mouthpiece, making the
scrubbers refillable, and changing the counterlung.
 My next major step was to
add an Air 2 regulator and pony bottle for dilution and bailout and the
necessary PPO sensors and displays. After many pool and quarry tests I took
that configuration to
Roatan
in January of 2002. It was a great success. My next major step was to
add an Air 2 regulator and pony bottle for dilution and bailout and the
necessary PPO sensors and displays. After many pool and quarry tests I took
that configuration to
Roatan
in January of 2002. It was a great success.
In the spring I moved the pony bottle from the bottom to the side, increased
the hose length, and made a few other minor modifications. In July I dove
with Dr. Bob in
La Jolla
California the weekend prior to Bobs and my
trip to Roatan where I used
it a lot while he tested some improvements of his FEOR.
I was ready for the full upgrade. The physical layout of the system was fine
except for the display. I wanted the display to be mounted on the scrubber
and reduce leak potential as well as dangling stuff. Construction started in
late August with each new element tested in the pool and the quarry. By mid
September I had a configuration that met all my needs. Bill Weatherford (a
diving buddy of some 42 years) and I tested it in the quarry while he tried
out his newly purchased RGU just out of the box. It was now time to "make it
pretty" If you have made it through all of this, here are the details of the
system and some information on the materials I used.
 Here is the system laid out.
You rebreather experts will understand the whole system at first glance.
Most of the ideas implemented here are old hat and some are over 100 years
old. The system consists of a single counterlung, axial scrubber, double
hoses with one way valves and shutoff in the mouthpiece, continuous flow
oxygen regulator on a tank and a dilution system that doubles as a bailout
bottle. Lastly there is a dual display of the PPO for diving below 20 feet. Here is the system laid out.
You rebreather experts will understand the whole system at first glance.
Most of the ideas implemented here are old hat and some are over 100 years
old. The system consists of a single counterlung, axial scrubber, double
hoses with one way valves and shutoff in the mouthpiece, continuous flow
oxygen regulator on a tank and a dilution system that doubles as a bailout
bottle. Lastly there is a dual display of the PPO for diving below 20 feet.

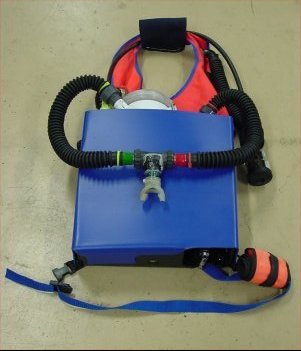
- Assembled it looks like this.
Kinda like getting those clowns back in the car at the circus. There is not
a lot of wasted space.
The RGU tank has been replaced with a 245 liter oxygen tank adapted to the
RGU constant flow regulator. I built a new scrubber for 3.5 pounds of sorb.
The pony bottle is now enclosed in the case. Lastly you can see the side of
the display at the top of the scrubber.
One of my guys welded draw latches to stainless steel bands to help me hold
the tanks and scrubber in place. It is a damned good thing that I got Allan
to do it because I can't make simple iron welds, much less thin stainless
steel.
The cover is on the right. The case is 1/4 inch black PVC and the cover is
1/8 inch blue polyethylene. Both are thermoplastic materials. Each started as
flat stock and were heated with a heat gun and bent into place to fit.
 Note the holes in the
cover. They match up with disks on the side of the case to hold the cover in
place. I used a cheap 2 inch hole saw to drill the cover. This is because
cheap hole saws have thin walls. Then I used the same hole saw to cuts disks
out of scrap case material. I sanded undercuts on the disks to help hold the
cover on when it would be in place. After putting the cover on in the exact
place I wanted it, I glued the disks to the case through the cover holes
with PVC cement. It came together quite nicely. Note the holes in the
cover. They match up with disks on the side of the case to hold the cover in
place. I used a cheap 2 inch hole saw to drill the cover. This is because
cheap hole saws have thin walls. Then I used the same hole saw to cuts disks
out of scrap case material. I sanded undercuts on the disks to help hold the
cover on when it would be in place. After putting the cover on in the exact
place I wanted it, I glued the disks to the case through the cover holes
with PVC cement. It came together quite nicely.
 Starting the loop tour at
the mouthpiece. The mouthpiece is one of the only RGU parts left but it is
modified in that a shutoff has been installed. The RGU hoses have been
replaced by new US Divers replacement hoses to reduce Work of Breathing (WOB).
Red on port side (exhausted air) and green on starboard side (inhaled air). Starting the loop tour at
the mouthpiece. The mouthpiece is one of the only RGU parts left but it is
modified in that a shutoff has been installed. The RGU hoses have been
replaced by new US Divers replacement hoses to reduce Work of Breathing (WOB).
Red on port side (exhausted air) and green on starboard side (inhaled air).
To make the hoses fit, I put PVC unions into a lathe and made hose barbs.
Then I heated the other end and slid them on the RGU hose fittings.
 Exhausted air goes down the
hose to the scrubber. The scrubber is made of 4 inch PVC. Sorb Screens are
modified snap drains from Home Depo backed up by air condition vent filters.
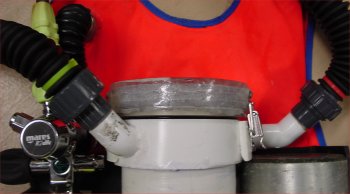
The top seal of the scrubber is the dual display. It is held on by stainless
steel draw snaps and has an "o" ring seal. Screw on fittings attach the hose
to the scrubber port (another fine product from Lowes). The exhaust air (red
marked hose) enters an external tube to the bottom of the scrubber. Exhausted air goes down the
hose to the scrubber. The scrubber is made of 4 inch PVC. Sorb Screens are
modified snap drains from Home Depo backed up by air condition vent filters.
The top seal of the scrubber is the dual display. It is held on by stainless
steel draw snaps and has an "o" ring seal. Screw on fittings attach the hose
to the scrubber port (another fine product from Lowes). The exhaust air (red
marked hose) enters an external tube to the bottom of the scrubber.
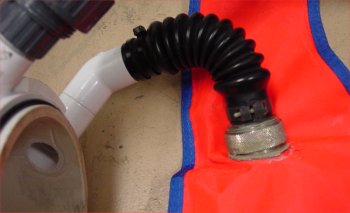 There is a water trap in
the bottom of the scrubber. There is a water trap in
the bottom of the scrubber.
The air flows up the scrubber and out a port through a short hose into the
counterlung. Another of the few parts of the original RGU that are left.
These include the counterlung port and the hose. I just cut a hole in the
snorkel vest and added the port from the RGU.
If you look closely you can see how the "o" ring fits on the scrubber. The
"O" ring support ring is a cut off PVC pipe cap that has been reversed and
glued in place.
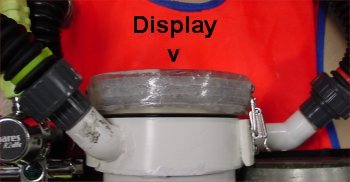 Air from the scrubber goes
back to the mouthpiece from the counterlung through the green (starboard)
marked hose. Again you can see the front view of the display, the side
snaps, and the "o" ring. Air from the scrubber goes
back to the mouthpiece from the counterlung through the green (starboard)
marked hose. Again you can see the front view of the display, the side
snaps, and the "o" ring.
The oxygen sensors are in the top of the scrubber and the electronics are in
the clear portion. The clear portion was made by gluing several Plexiglass
rings together and gluing a piece of Plexiglass on the top. Displays are
glued to the Plexiglass on the top to prevent condensation from making them
hard to read. 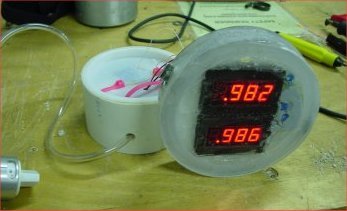 There is a pot
to adjust each of the two displays to make the sensors agree with a known
PPO. There is a pot
to adjust each of the two displays to make the sensors agree with a known
PPO.
I cut off a short section of 4 inch PVC to make a calibration device for the
sensors/display module. The sensor support fits in the PVC pipe and the
display can be adjusted. Oxygen is introduced from a regulator flowing at 1
liter a minute into the calibrator when it is flat on the table. This allows
the span adjust.
 The low validation point is
the ambient air PPO. I just turn off the oxygen flow and tip the holder up
to expose the sensors to ambient air. I note where the display reads. The
last digit is not important. Because the slope of the two sensor/displays is
not going to be exact, I am not concerned that they are a little off. There
is uncertainty in any measurement process. I have no intention of going
anywhere near as low as .21 PPO when I am diving. The low validation point is
the ambient air PPO. I just turn off the oxygen flow and tip the holder up
to expose the sensors to ambient air. I note where the display reads. The
last digit is not important. Because the slope of the two sensor/displays is
not going to be exact, I am not concerned that they are a little off. There
is uncertainty in any measurement process. I have no intention of going
anywhere near as low as .21 PPO when I am diving.
 Guess the next to last digit
is not really important. Below .6 and I bailout. Guess the next to last digit
is not really important. Below .6 and I bailout.
A second display sensor head was made with LCD displays. I still have not
decided which one I like. My buddies love the led display if I am behind
them because they can see me in the murk. In dark water, it is best.
However, a new battery is needed every two hours. Maybe a second battery in
the housing....The LCD displays last all week. Just before a dive I now give
the sensors a little exhausted breath test to check that they go below the
.20 PPO. With no oxygen flowing I breath the system to watch the sensors
flow down...checking how closely they track. This is the divers eye view of
the displays.
 Snapping the cover on and
here is how it all hangs together. A few things to note. The hose from the
air bottle goes up and around the vest and attaches to an Scubapro Air 2
regulator. This allow introduction of air to the counter lung bringing up
the nitrogen level below 20 feet. It also acts as the bailout regulator.
There is a pressure gauge on the bailout bottle first stage for pre dive
checks. The Air 2 regulator does not dangle, it is held in place by a rubber
mouthpiece holder. Snapping the cover on and
here is how it all hangs together. A few things to note. The hose from the
air bottle goes up and around the vest and attaches to an Scubapro Air 2
regulator. This allow introduction of air to the counter lung bringing up
the nitrogen level below 20 feet. It also acts as the bailout regulator.
There is a pressure gauge on the bailout bottle first stage for pre dive
checks. The Air 2 regulator does not dangle, it is held in place by a rubber
mouthpiece holder.
Completing the rig is a matching blue waist strap, a pad for the neck of the
vest and some "D" rings to attach things like cameras, signaling devices,
etc.. when diving.
As I proudly gazed upon it, I realized that something was missing. A
logo....not a stick on Logo but an embossed logo....back to the shop...
 As the cover is
polyethylene, it can be distorted to a desireable shape by heat and
pressure. Thats how lots of toys and decorative things are made. I drew a
simple outline of a seahorse and cut it out. That was going to be the male
plug part of my mold. I drew the outline on the covermaterial. Using a
scroll saw I cut it out. Then I drew the outline of the male plug on another
piece, made the outline wider, and cut it out to make the female cavity. As the cover is
polyethylene, it can be distorted to a desireable shape by heat and
pressure. Thats how lots of toys and decorative things are made. I drew a
simple outline of a seahorse and cut it out. That was going to be the male
plug part of my mold. I drew the outline on the covermaterial. Using a
scroll saw I cut it out. Then I drew the outline of the male plug on another
piece, made the outline wider, and cut it out to make the female cavity.
Using the seahorse and the hole from the other seahorse, I made a press mold
by carefully positioning the two pieces together and gluing them in a
sandwich. Then I added a piece of 5/8 in plywood to the pressmold so I could
stand on it to provide the necessary pressure. Now I had the necessary
ingredients, heat and pressure.
 I tried the press mold on a
piece of scrap from the cover. I softened it with my heat gun and pressed it
between the two patterns in the vise. It worked perfectly the first time. I tried the press mold on a
piece of scrap from the cover. I softened it with my heat gun and pressed it
between the two patterns in the vise. It worked perfectly the first time.
That is unusual when I make things. I was excited and decided to do the
cover. This is when I usually screw up. Trying to do something with very
little practice...
 I carefully heated the area
of the cover that was going to be molded until it was like soft rubber,
quickly placed the cover between the parts of the sandwich, placed one of my
size 10 1/2 EEEE feet on it with my full weight, and stood on one foot like
a stork. I carefully heated the area
of the cover that was going to be molded until it was like soft rubber,
quickly placed the cover between the parts of the sandwich, placed one of my
size 10 1/2 EEEE feet on it with my full weight, and stood on one foot like
a stork.
Was it going to work or would I now spend more hours making a new cover
after I screwed up?
I stood nervously for a few minutes for the cover to cool in the mold. I
took the cover out and there was my seahorse. It worked....and here is the
fully assembled system in its present state.

Goals met. Light weight...Long dive potential...Compact design...Nothing
dangling...Kiss operation...and the only tools needed are a tiny screwdriver
to adjust the pot on the display and a wirewrap tool about the same size to
change sensors. Everything else hand tightens or snaps together.
After writing this I got a number of responses asking for a better
description of the rebreather
operation.
I enjoyed seeing a bunch of rebreather guys at DEMA where I showed off the
system at one of the two rebreather parties. No comment on some of the
comments....Gordon just shook his head and sighed. Guess he figured I was
the next casualty in the body count.
Where am I going with this? Looks like two slight modifications...Since I
bit the bullet at DEMA and got a booster pump, I will replace the oxygen
tank with either the old RGU tank or with an oxygen cleaned pony bottle to
match the air bottle. That will allow a smaller case...but require 200 bar
O2 at dive sites. Looks like there will be two cases...One for local diving
and one for remote locations....After the slight modifications....I'm going
diving....
Yahoo....lets go
diving.....dive...eat...drink...sleep...dive...eat....dive....eat...dive....sleep...dive...
I want to thank Tom Rose for his contribution to this section!
Janwillem Bech
|
