|
|
||||||
|
|
||||||
| Juergensen
Marine is trots U de nieuwe "Hammerhead" scrubber deksel voor de Inspiration™
Rebreather aan te kondigen. Reeds Jarenlang bouwt en ontwerpt Juergensen Marine in samenwerking met Will Smithers van Digital Deep electronica voor Closed Circuit Mixed gas rebreathers. Ook ontwerpen zij nieuwe producten voor de Mark 15 en 15,5 CCR nu in gebruik bij burgers en vroeger door de US Navy. We hebben de kennis die in jaren is verzameld nu toegepast op de Inspiration™ rebreather, door de ontwikkeling van de Hammerhead™ scrubberdeksel vervanging. Laten we eens naar het nieuwe systeem kijken: |
 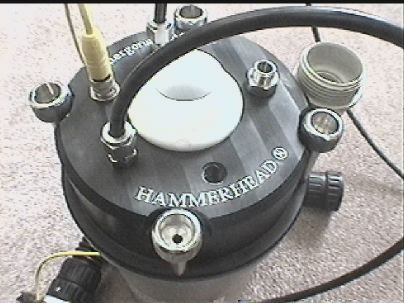 |
We are very proud to announce the beginning of production of the ALL NEW Juergensen Marine "Hammerhead" replacement Head/Electronics assembly for the Inspiration™ Rebreather!For several years, Juergensen Marine, in association with Will Smithers of Digital Deep, has been building and installing digital electronics for Closed Circuit Mixed Gas Rebreathers, as well as building and designing new products for the civilian Mark 15/15.5 CCR's used in past years by the US Navy.We have now applied the knowledge gained over the years to the Inspiration™ rebreather, to come up with the Hammerhead™ Replacement Head and Electronics.Let's look at what's new about this system:
|
||||
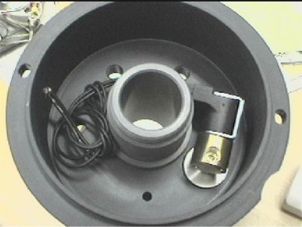
| Hier zie je de binnenkant van de nieuwe deksel. Het zal je opvallen dat er nu een massieve plaat is gemonteerd met daarin de sensors. De sensors zijn naar beneden gericht, en optimaal geplaatst zodat er gemakkelijk een cel kan worden uitgewisseld. En nog iets...... |
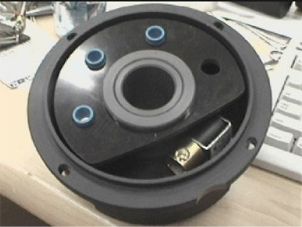 |
This is the inside of the new Head. You will notice there is now a solid plate which holds the Sensors. They are facing down, and are well spaced to give plenty of room for installing them into the Replacement Head - and one more thing: | ||||
| We hebben de plaat standaard voorzien van een vierde poort. Hierdoor kan de duiker zijn VR-3 of HUD aansluiten met een andere sensor (bijvoorbeeld een R-22DHO, of zelfs een K1-D met een goede passing om hem vast te zetten), teneinde de goede werking van de drie normale cellen te controleren. Een aanpassing voor de echte paranoia duikers! Mogelijk vraag je je af "hoe moeilijk is het nu om de sensors uit te wisselen?... |
 |
We have included a port for a 4th sensor - the diver can use their VR-3 or HUD with a different sensor (say a R-22DHO, or even a K1-D with a proper fitting to hold it) in order to verify the operation of the other three. An innovation for the truly paranoid! Now - you may be wondering, "how hard will it be to open this and change your sensors?...." | ||||
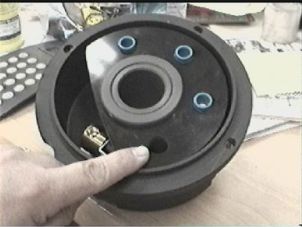
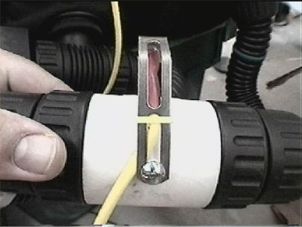
| Door de grijze moer te verwijderen (de ronde grijze moer zoals afgebeeld op de foto hierboven) wordt de sensorhouder uitgenomen. Wat hier niet wordt getoond is dat de bedrading anders is uitgevoerd. De Molex connector van de sensor loopt naar een vergulde messing mini bananenplug. Per cel is dus een uitneembaar kabeltje. Hierdoor geen zorgen meer over gedraaide bekabeling, slechte contacten of corrosie. Is een kabeltje slecht, wissel deze eenvoudig uit. Voor ca 5 euro wordt een nieuwe geplaatst. |
 |
With the removal of one nut (the round gray one in the picture above this one) your Sensor Plate is removed - what isn't shown here is that the plugs out of the 3 sensors actually lead to micro Banana Plugs which are Gold Plated Brass - the Jacks for these are permanently mounted in the Head and sealed. That means that the wires leading from your sensors have connectors at either end - one end is the Molex that goes into the actual sensor, and the other end is a Gold Plated Brass Banana Plug - if either end of these gets corroded, you toss them out and put in new ones for about $5. No more worries about twisting wires, bad connections to your sensors, or globs of plastic all over the place. | ||||
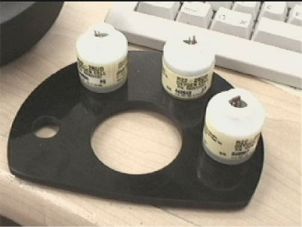
| Doordat in dit
ontwerp de batterijen naar de handsets zijn verplaatst, ontstaat er ruimte
voor een vierde cel. Bovendien is een groot deel van de bekabeling die in de
oorspronkelijke deksel zat verdwenen. Een voordeel is dat de sensors nu
rechtop staan. De poorten in de deksel kunnen worden aangepast naar
behoefte. Standaard is de deksel uitgevoerd met doorvoeren voor een primaire
en secundaire handset. (De primaire handset bestuurd de Solenoïde, de
secundaire is de secundaire display, die onafhankelijk is aangesloten,
bekabeld, en een aparte voeding heeft, voor echte redundantie). De deksel
kan worden uitgevoerd met een Head Up Display uitgang, geheel geïntegreerd
in het systeem waarbij gebruik wordt gemaakt van de vierde ingebouwde cel.
Uiteraard kan ook de externe versie worden gebruikt de Bob Howell cell
holder, of er kan een aansluiting worden gerealiseerd voor een directe
aansluiting van de VR3 op de vierde cel. (Opmerking: J.W. Bech; uit de text wordt niet duidelijk of de secundairy display ook de besturing van de Solenoïde overneemt, zoals bij de originele handsets het geval is.) |
 |
Since the Battery and Control electronics are in the Wrist Unit - we have eliminated much of the clutter found in the original head itself, and consequently have lots of room for the Sensors to stand straight up (as well as adding a 4th). The ports in the top of this unit can be configured in any way that the diver wants to - they come standard with a Primary and a Secondary Display (the Primary controls the Solenoid, the Secondary is a backup Display which is independently wired and powered - for TRUE redundancy) - then they can have either a HUD integrated into the system (via the Internal 3 sensors, the Internal 4th sensor, or an External Sensor, a la the Bob Howell Mod) - or they can have a connector to go directly to their VR-3 (once again, via the 3 Internal sensors, or 4th Internal sensor). | ||||
| Zo ziet de
deksel eruit met de Lumberg kabels gemonteerd. Vanuit de positie10 uur
klokstand de volgende aansluitingen: 1)Gouden
kap voor druk transmitter |
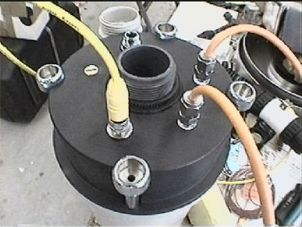 |
This is what it looks like with
the Lumberg Cables attached. You'll notice from around the 10 o'clock
position the following things: 1) Gold cap for Pressure Transducer 2) Oxygen Port for the Solenoid 3) Primary Display Lumberg Cable 4) Secondary Display Lumberg Cable 5) HUD Lumberg Cable |
||||
| Hier zie je alle componenten gemonteerd in de Inspiration behuizing. Zoals zichtbaar op deze foto kan de deksel direct worden geplaatst op de bestaande scrubber. Om dit systeem te plaatsen haal je van de bestaande rebreather de deksel af kompleet met electronica handsets en bewaar deze op een veilige plaats. Plaats de nieuwe scrubber deksel sluit de zuurstof slang aan, sluit de HUD aan op het mondstuk, en je bent klaar voor de duik. Het is echt zeer simpel. Er hoeft verder niets aangepast te worden of overgeplaatst te worden uit de oude deksel (behalve misschien de zuurstofcellen die je in de nieuwe configuratie wil gebruiken). Echte Plug & Play. |
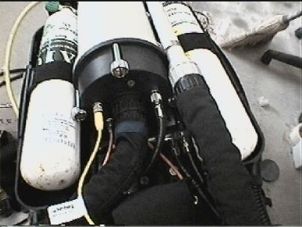 |
Here it is all assembled, and installed into the Inspiration housing. This is now a DIRECT REPLACEMENT for the existing Inspiration Head. To install this system, you simply remove your existing Inspiration Head, complete with all internal and external connections/batteries/electronics/etc, and put them in a closet somewhere safe. You then attach this Replacement Head, hook up your intake/exhaust and Oxygen hoses and DSV and go diving. It is really just that simple. Nothing more to add, nothing to remove from your old Head (except for the O2 Sensors if you want to use them in this new assembly). True "Plug and Play." |
||||
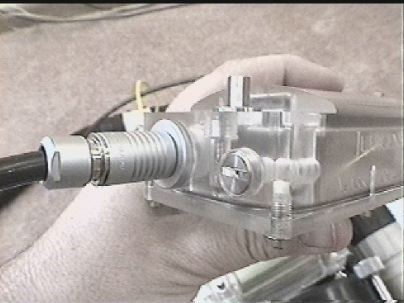
| Een nadere blik op de assemblage toont een fraai ontworpen layout. De slangen en aansluitingen passen uitstekend in de behuizing |
 |
A closer view of all the connections and how well they all line up. The complete assembly fits very well and tight into the body of the Rebreather. | ||||
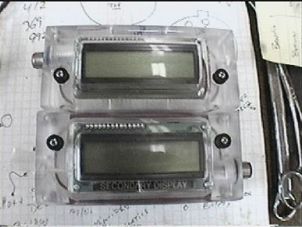
| Een van de beste aspecten van dit systeem zijn de Displays. Op deze foto zie je alle drie de displays. De primaire display links, de secundaire rechts, en de HUD geplaatst op het mondstuk. Triple redundancy in een gebruikersvriendelijke unit. Als de primaire unit niet meer werkt neemt de secundaire het over voor wat betreft de cel uitlezing. Het display toont je wat de cellen meten en de HUD informeert je over de gemeten waarden van alle drie de sensors of van een vierde sensor. Als de secundaire display niet meer werkt, heb je de HUD. Als de HUD niet meer werkt, ja dan zou ik een afspraak met een dominee maken ..... |
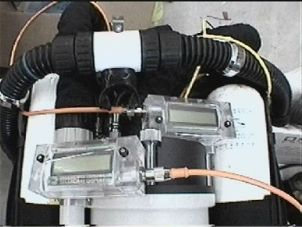 |
But one of the best things about this system is the Displays. Here are all three displays - the Primary on the Left and the Secondary on the Right, as well as the HUD (Mounted on the DSV at the top). TRUE TRIPLE REDUNDANCY in one compact user-friendly unit. If your Primary fails, you have your Secondary Display to tell you what your 3 ppO2 readings are, as well as the HUD to keep you informed of your ppO2 from either all three sensors, or a 4th sensor (your choice). If your Secondary fails, you have your HUD. If your HUD fails, well, then, you really need to book some time with the vicker... | ||||
| Hier is een close-up hoe de houder van de driekleurige led op het mondstuk is bevestigd. Hiervoor wordt gebruik gemaakt van de bestaande schroef in het mondstuk. Aan het bestaande mondstuk hoeven geen veranderingen aangebracht te worden. Schroef eenvoudig de schroef uit de behuizing, plaats de led houder en herplaats de schroef. De houder maakt het mogelijk de led zo af te stellen dat deze zich in het gezichtsveld bevindt. |
 |
Here is a close-up of how the bracket holding the Tri-Colored LED mounts to the existing screw on the Inspiration DSV. NO MODIFICATIONS NEEDED - Just loosen the screw, slip it through the adjustable bracket, and tighten it up where it is comfortably in your field of vision. Done. | ||||
| Hier is een foto van de HUD gemonteerd in de houder. De duiker kan kiezen om de led in het linker of het rechter oog te zien door het op de schroef te draaien. |
 |
Here is a front view of the LED mounted on it's bracket. The diver can move this to the Left Eye or the Right Eye by rotating it left or right, or folding it out of the way completely.
|
||||
| De primaire en secundaire
display zijn identiek echter gespiegeld qua ontwerp. Ook de bedrading is
identiek. Indien een duiker de master en slave gewisseld zou willen
bijvoorbeeld master links ipv rechts, kan dit bij een order worden
opgegeven. De displays worden vergroot weergegeven door gebruik te maken van het Varicon™ Convex lensen systeem. Dit systeem vergroot de LCD weergave om het beeld te verbeteren. Beide displays hebben standaard Backlight |
 |
We use identical assemblies for the Primary and Secondary, except they are mirror-image of each other. We also wire them identically, so if a diver wishes to reverse them (i.e. wear the Primary on the Right Wrist instead of the Left, they can do so by requesting that option at the time of ordering.The Displays also incorporate the "Varicon™" Convex Lens System, which actually Magnifies the LCD Image for easier viewing. Both Displays come with built-in BACKLIGHT as Standard.
|
||||
| Deze foto toont
het diplay in een Waarschuwings modus. Van links naar rechts op de bovenste
regel zie je; 1)Waarschuwing, één van de
sensors is door het logic systeem uitgesloten. |
  |
This shows the Secondary Display in it's "WARN"
condition. >From Left to Right, you will see: Top Line:
|
||||
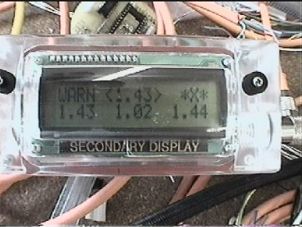
| In dit geval zie je een alarm van de secondary display met de melding "PO2!"om aandacht te vragen voor een te hoge partiele zuurstofdruk van 1.67 bar. |
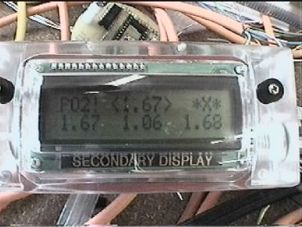 |
In this case, you will see that the Secondary is yelling "PO2!" at the diver, calling their attention to a high ppO2 of 1.67. | ||||
|
The unit also has a built-in Trimix Decompression Computer - as soon as we get pictures of the Screen Shots for that, we'll post 'em here!
We are currently accepting
initial-run orders for the Hammerhead™ from a limited number of divers. The
first deliveries will be made sometime around late October, early November.
We are using this limited offer to gauge demand, and therefore deliveries
after the initial run could be as late as early to mid 2003. The Beta-Run
Order price was $2,000 USD - the second Run cost If you wish to be included in the Initial Run, please send an e-mail to us at hammerhead@electricfilm.com Please include some information about your Dive Experience and Certification Level.
|
||||||
|
De unit heeft een ingebouwde Trimix Decompressie Computer. Zodra er afbeeldingen beschikbaar zijn worden deze hier gepubliceerd! Op dit moment wordt door Juergenson een beperkt aantal opdrachten geaccepteerd voor een kleine groep duikers. De eerste leveringen zullen uitgevoerd worden rond Oktober November. Er wordt een eerste shift uitgeleverd tegen een speciale prijs van $2000,- Na de eerste pre-leveringen worden reguliere orders geaccepteerd tegen een bedrag van circa $2500,-- De uiteindelijke prijs zal $2.995,00 bedragen. Als je wil deelnemen aan de pre-leveringen stuur dan
een email aan |
||||||
|
||||||
| DECEMBER 2003: Updates are available on the HAMMERHEAD at: http://www.electricfilm.com/hammerhead.html | ||||||
|
UPDATE
But one of the biggest problems faced by CCR Controllers and Dive Computers today is the issue of Alarms. Most divers hate Alarms - they either beep too loud (and too often), or they don't beep loud enough. Many times, when you hear a beep, it happens to be your dive buddy, or someone else near the dive site even! Well - Juergensen decided to do something about that for CCR divers...
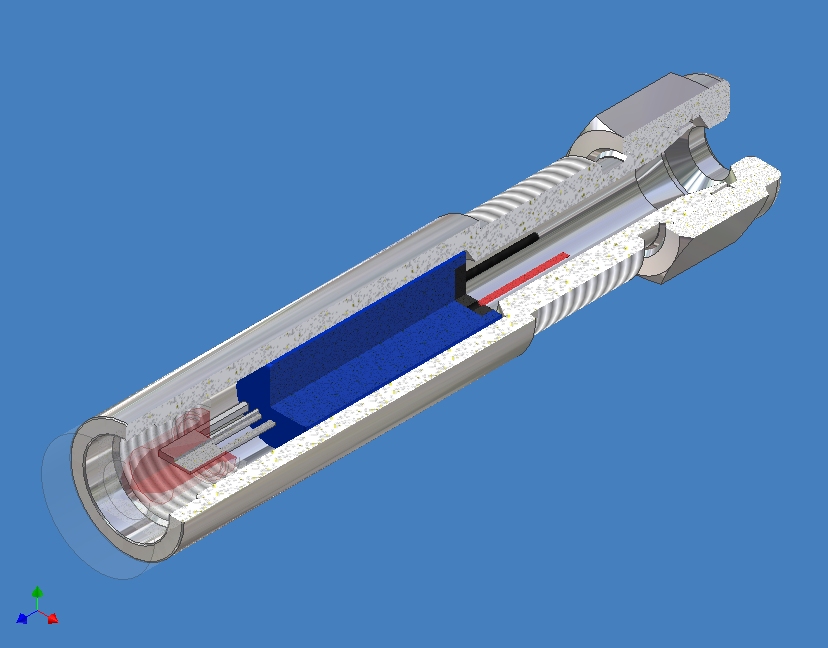
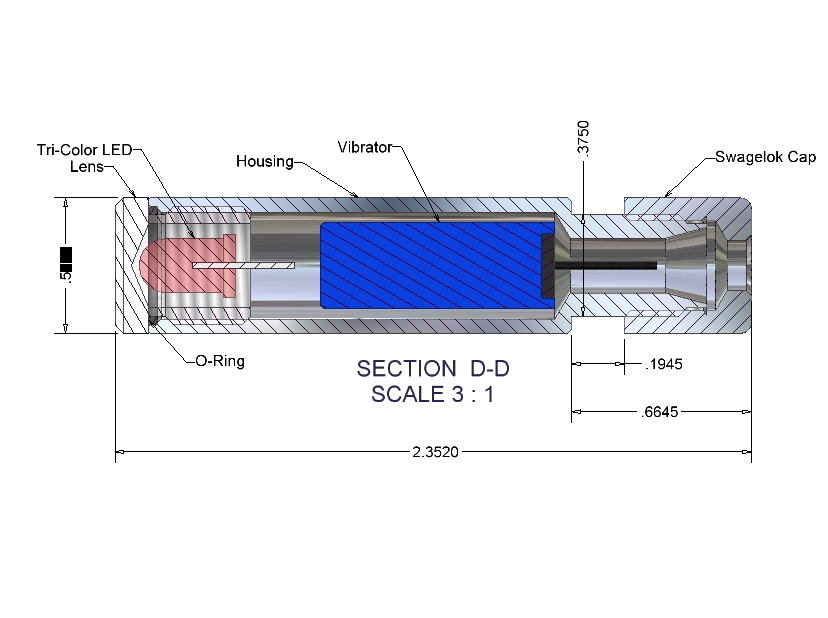
This is the inside of the new DIVA™. You will notice there is a blue cylinder behind the LED in the drawing above. This is a Sealed Vibrating Motor which, when activated, spins an eccentric weight at approximately 7,000 rpm. When attached to the Dive Surface Valve it not only transmits pulses of vibration to the divers mouth (a very sensitive place!) but also sound (described as a "buzzing bee" by our completely unwilling test subjects!) - you feel and hear your alarms at the same time - no more mistaking someone elses alarm for your own! This is as "personal" as it gets!
In this image, we've cross-sectioned the DIVA™ so you can see the internal guts of the unit laid out. The entire package is 2.35 Inches long. The unit is completely sealed, and maintenance-free. The Body is machined from 316 Stainless with thick walls, so it can take a beating and still keep on ticking!
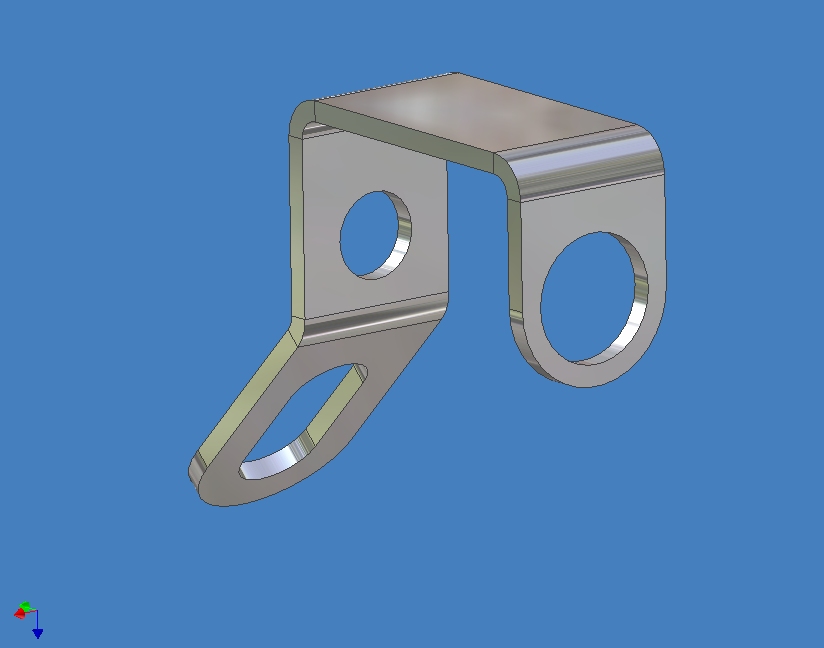
This is the Bracket which conveniently mounts to the Inspiration DSV via the front screw:
You'll notice the "slot" at the back of the DIVA™ Bracket - this is so that you can adjust the height of the DIVA to suit your own personal preference!
Like everything we build, we try to keep real divers in mind, and wherever possible give them options to control and adjust their system to their own liking - and we don't have to tell you that giving divers choices as to how their particular machine works is a rather radical concept in dive computers and controllers! To that end, you will be able to adjust ALL your System Alarms/Notifications which include: 1) LED's located in BOTH Primary and Secondary Displays - On or Off - Divers choice 2) DIVA™ Alarms: • Low/High Set-Point out-of-range (On/Off) • Fast Ascent Warning (On/Off) • Deco Stop Violation Warning (On/Off) •Hypoxic Mix Alarm (On/Off)
3) Wrist Unit Alarms: Backlights Flash on/off during Alarm Events which should also notify nearby divers that your system needs attention (in low light conditions, of course) - thereby alerting buddies that you may need assistance.
NOTE: Low (less than .20) and High (greater than 1.8) ppO2 Alarms are NOT able to be turned off by the diver.
for even more detailled information please take a look
here |
||||||
| After some trouble in the beginning
with the solenoid firing pattern, some improvements are made.
The new solenoid firing pattern works like the inspiration one but better, variable solenoid opening and its adaptive, which means it learns the characteristics of the loop and the diver breathing from it and adjusts to suit. information supplied by Dave Thompson |
||||||
|
|
||||||
|
|
||||||
|
Thanks to Bob Howell for informing me on this issue |
Thanks to Kevin Juergenson for allowing publication | |||||
|
||||||